Native Editors🔗
VST Live offers dedicated editors for most Track types, custom-designed for the specialized need of live performance. Each is accessed with an associated View button in the main Toolbar.
- Lyrics
- Chords
- MIDI
- DMX
Lyrics🔗
The Lyric Editor allows you to create Lyric Events at specific moments on a Song’s Timeline. Each Event is one line of lyrics.
Adding Lyrics🔗
Lyrics are added by moving the Transport Bar to where/when you wish to add the lyric, and clicking the Plus icon.
- To reposition the Transport Bar, click on the desired time in the left column.
Selecting Lyrics🔗
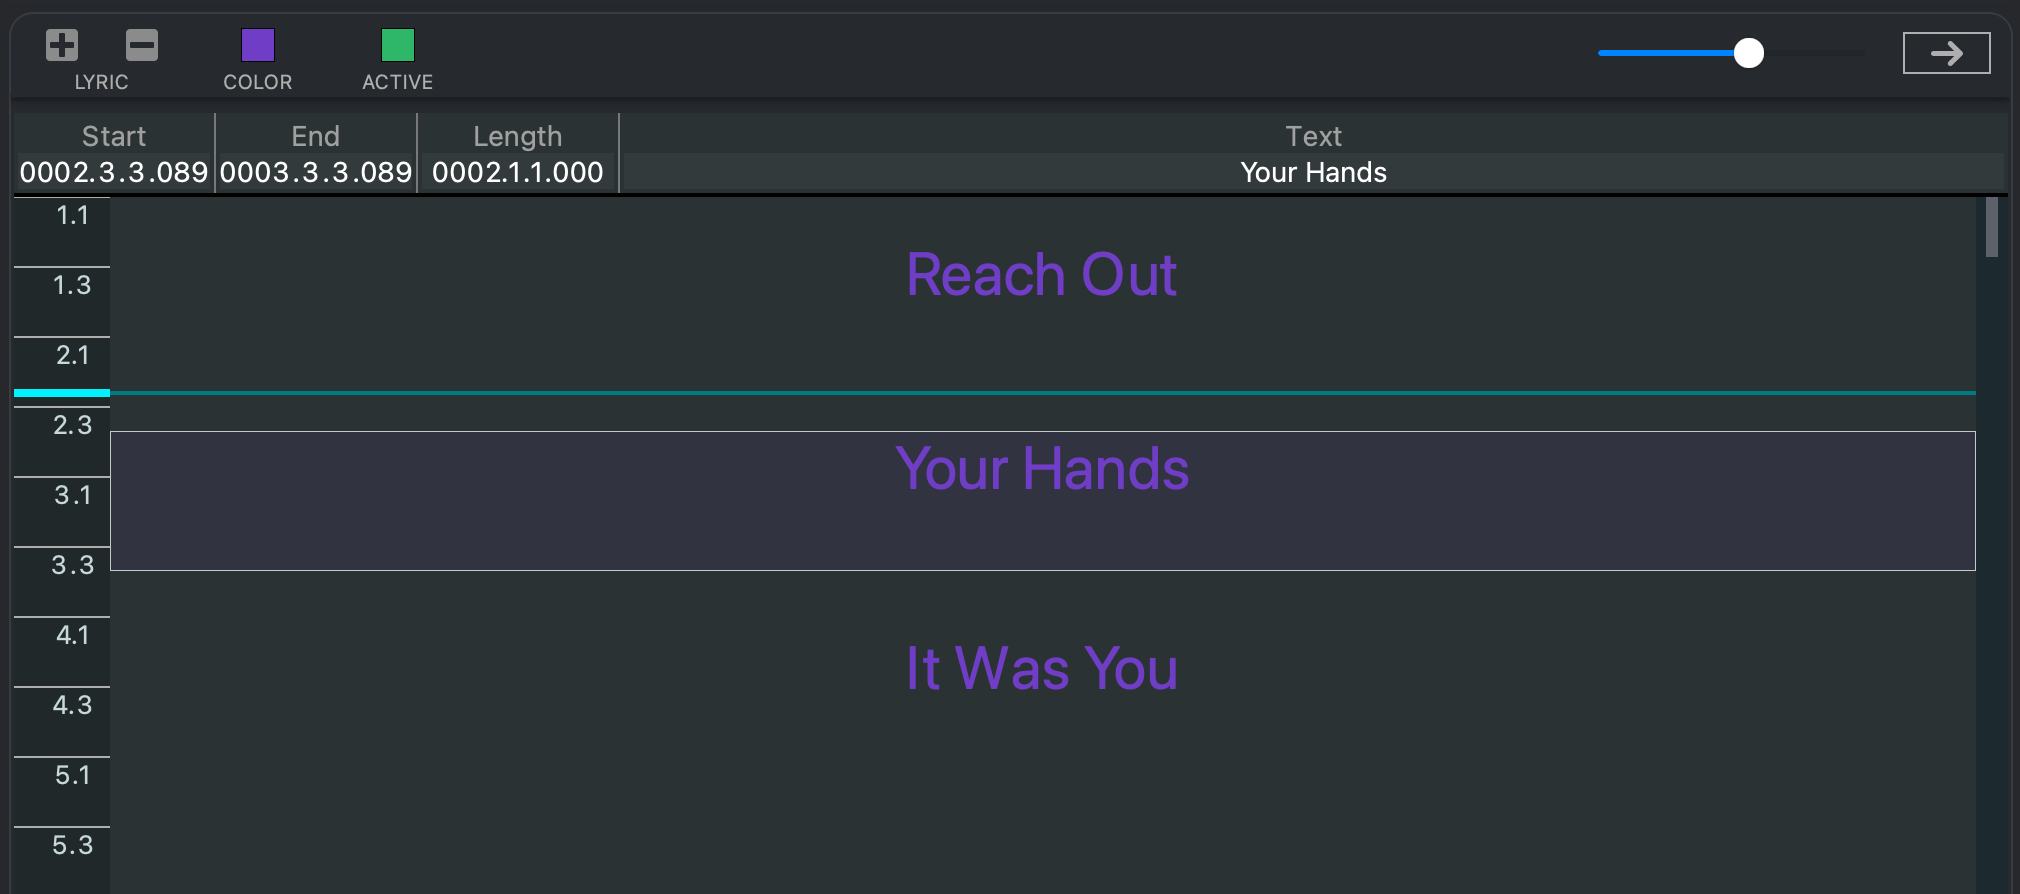
To select a lyric (line), click on the words. A box will appear around the lyric, and the words will appear above the workspace.
Editing Lyrics🔗
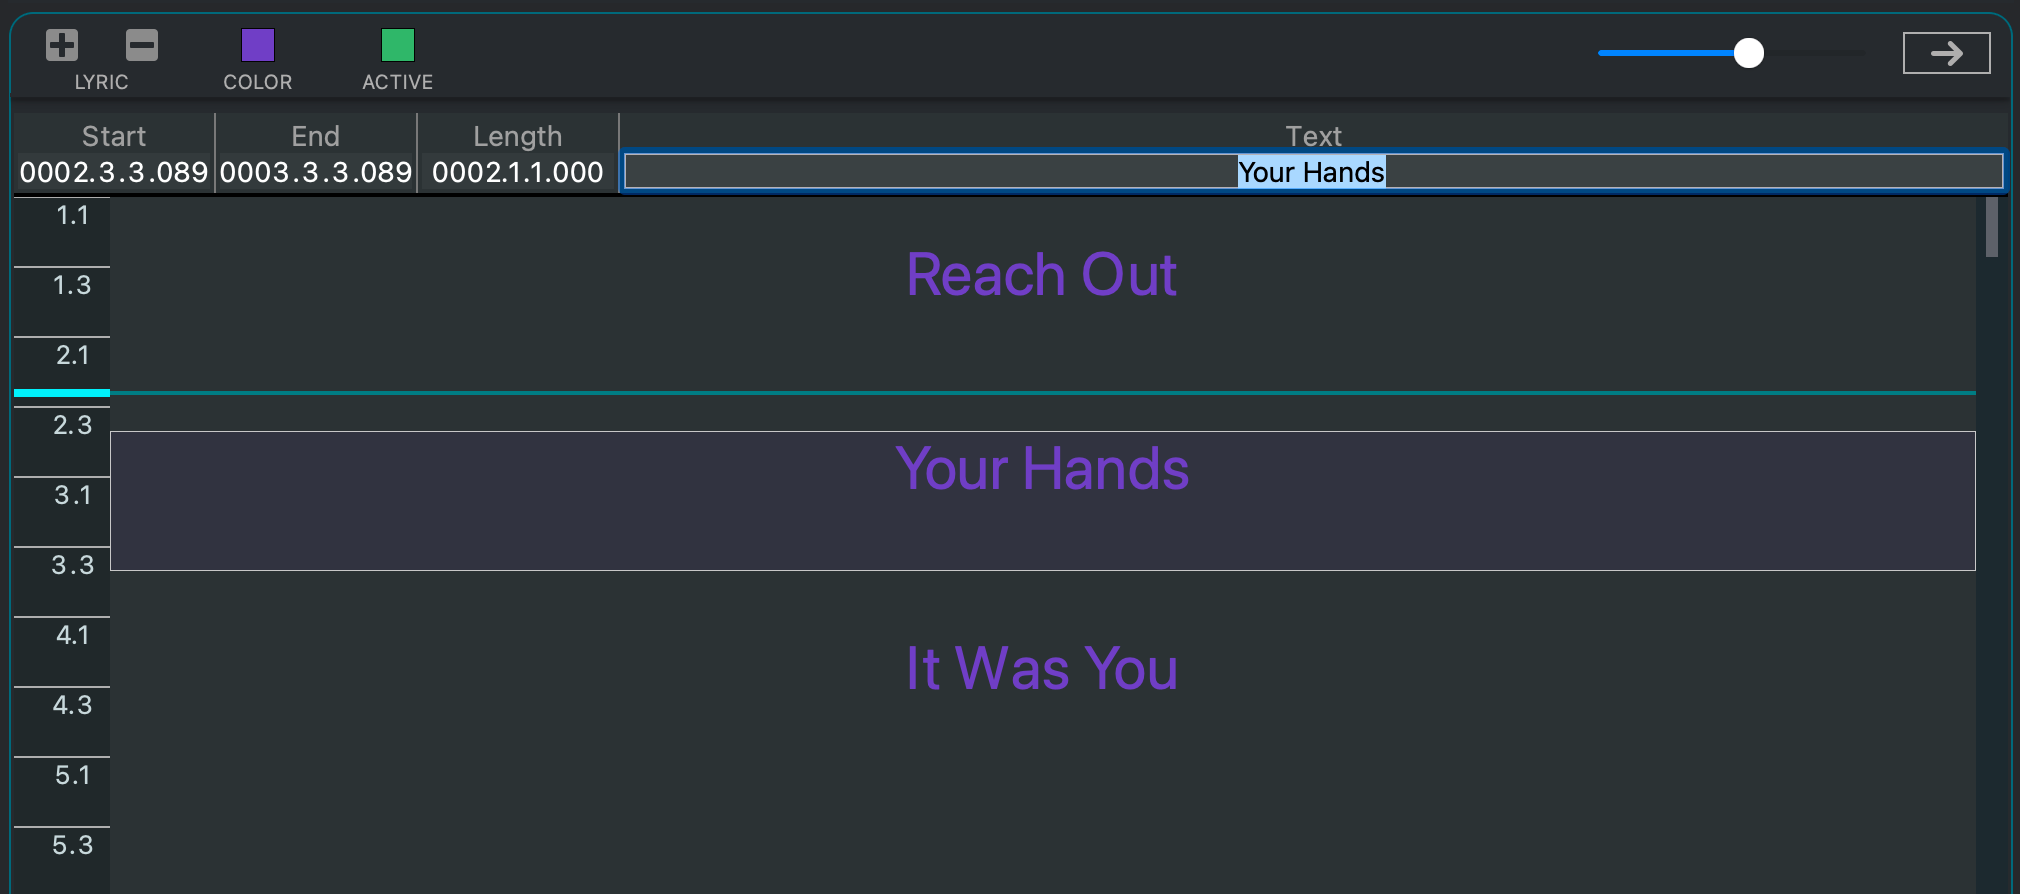
Once a lyric is selected, double-click it to edit. A blue box will appear around the text above the workspace; begin typing to edit your Lyric, and press Return to complete.
Deleting a Lyric🔗
To delete a Lyric Event, first select the line, then click the Minus icon.
Changing Colors🔗
To change the inactive or active colors, click on the respective colored box in the ribbon above the workspace.
Playback Visualisation🔗
When used as a playback visualizer (e.g., to cue you while performing a Song), the aqua Transport Bar will move from top to bottom.
Between Lyrics🔗
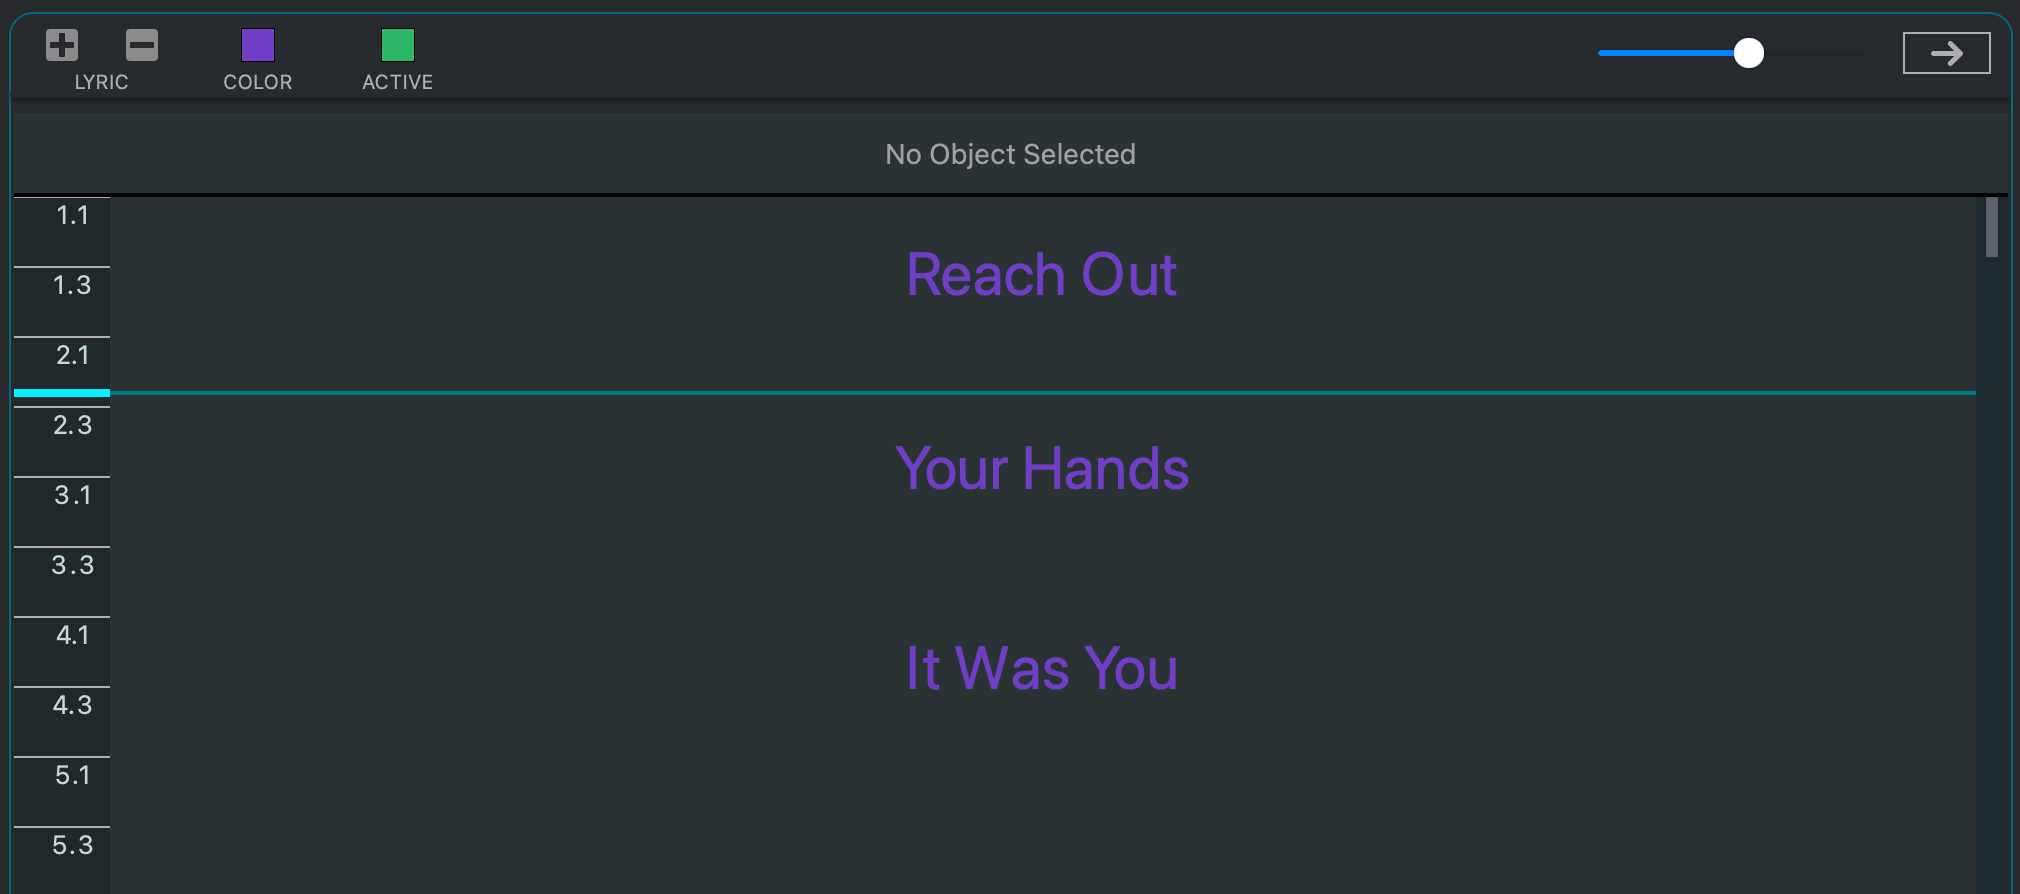
When the Transport Bar is between lyrics, the words remain their inactive color (defaulting to purple).
On Lyrics🔗
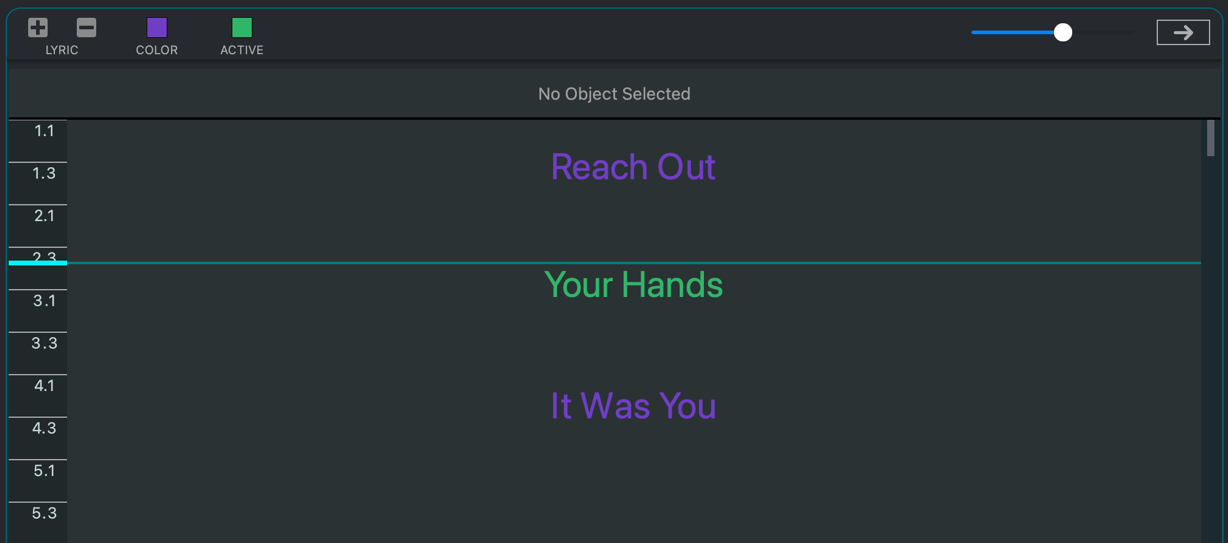
When a Lyric Event occurs, the text turns to the active color (defaulting to green).
Chords🔗
The Chord Editor allows you to create Chord Events at specific moments on a Song’s Timeline.
Chord Events🔗
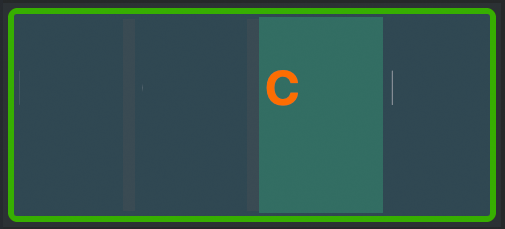
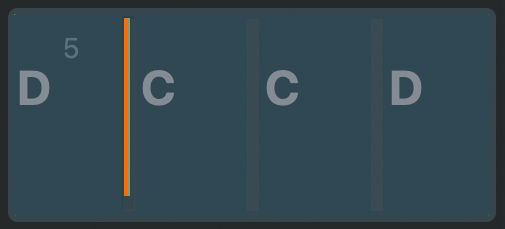
The Chord Editor shows each bar of your song as a rectangle, with slots for Chord Events. The number of Chord Events in a bar is equal to the number of beats in the time signature.
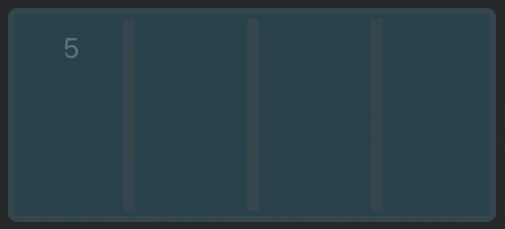
A Song has a 4/4 time signature, and therefore four Chord Events per bar.
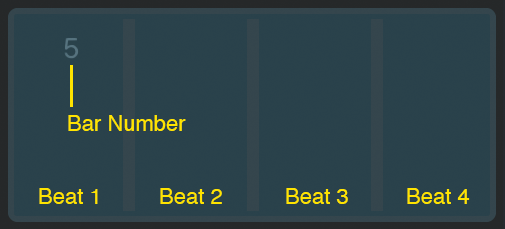
The bar number is displayed in the upper-left corner; the beats go from left to right.
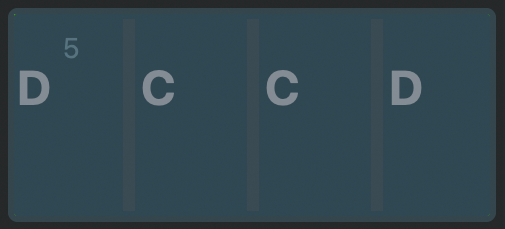
When chords are assigned to all four beats, each appears in one of the slots.
The Chord Editor🔗
Chords are added, modified and removed using the Chord Editor, located at the bottom of the Chord View. Some of the icons represents buttons to push; other are display fields.
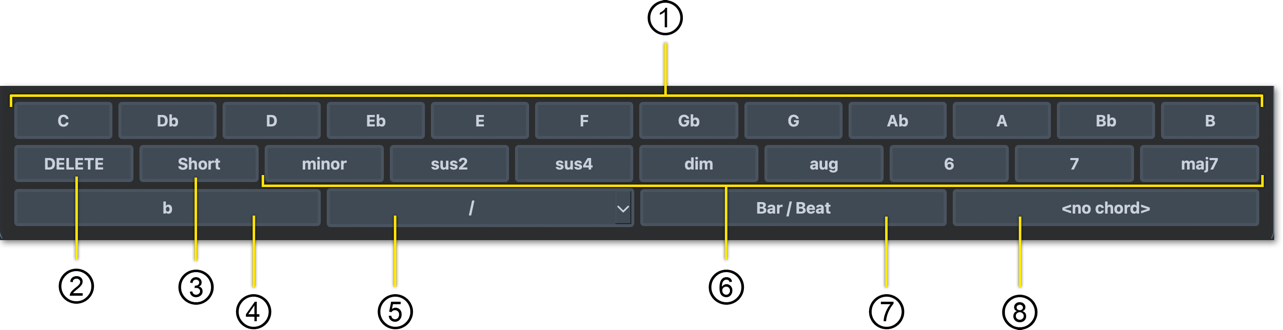
- Chord Roots (Button)
The twelve assignable chord roots.
- Delete (Button)
If a Chord Event slot is selected, and contains a chord, clicking this button will remove the chord from the slot.
- Shorthand (Button)
Toggles between chord names being displayed in short or long form.
- Sharp/Flat Selector (Button)
Toggles between sharps and flats for the twelve chord root buttons.
- Slash Chord (Button)
Assigns slash chords. (A slash chord is a chord indicates emphasis of a bass note other than the chord’s root.)
-
Chord Version (Button)
The eight assignable chord versions.
-
Chord Event Bar/Beat (Display)
When a Chord Event slot is selected and contains a chord, this field displays the bar and beat of the Event.
- Chord Name (Display)
If a Chord Event slot is selected, and contains a chord, this field displays the chord’s name.
Editing a Chord🔗
Chords are added, changed and remove by clicking on the desired Event, and then clicking the appropriate button in the Chord Editor.
Adding a Chord🔗
- Click the chord root you wish in the Chord Editor.
- Click the chord variation you wish in the Chord Editor.
- Click inside the desired Chord Event.
When you click in the Chord Event:
- The full bar will be selected
- The chord will be added to the Event slot.
Changing a Chord🔗
The procedure for changing a chord is the same as for adding one.
Deleting a Chord🔗
- Click inside the desired Chord Event.
- Click the Delete button in the Chord Editor.
Playback Visualisation🔗
When used as a playback visualizer (e.g., to cue you while performing a Song), the orange Transport Bar will move from left to right.
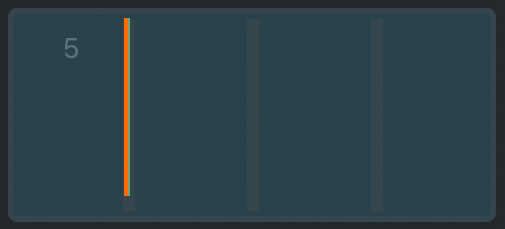
As the Transport Bar moves through Chord Events, the chords are not highlighted—you simply see the Transport Bar move in relation to the Chords.
MIDI Track Editor🔗
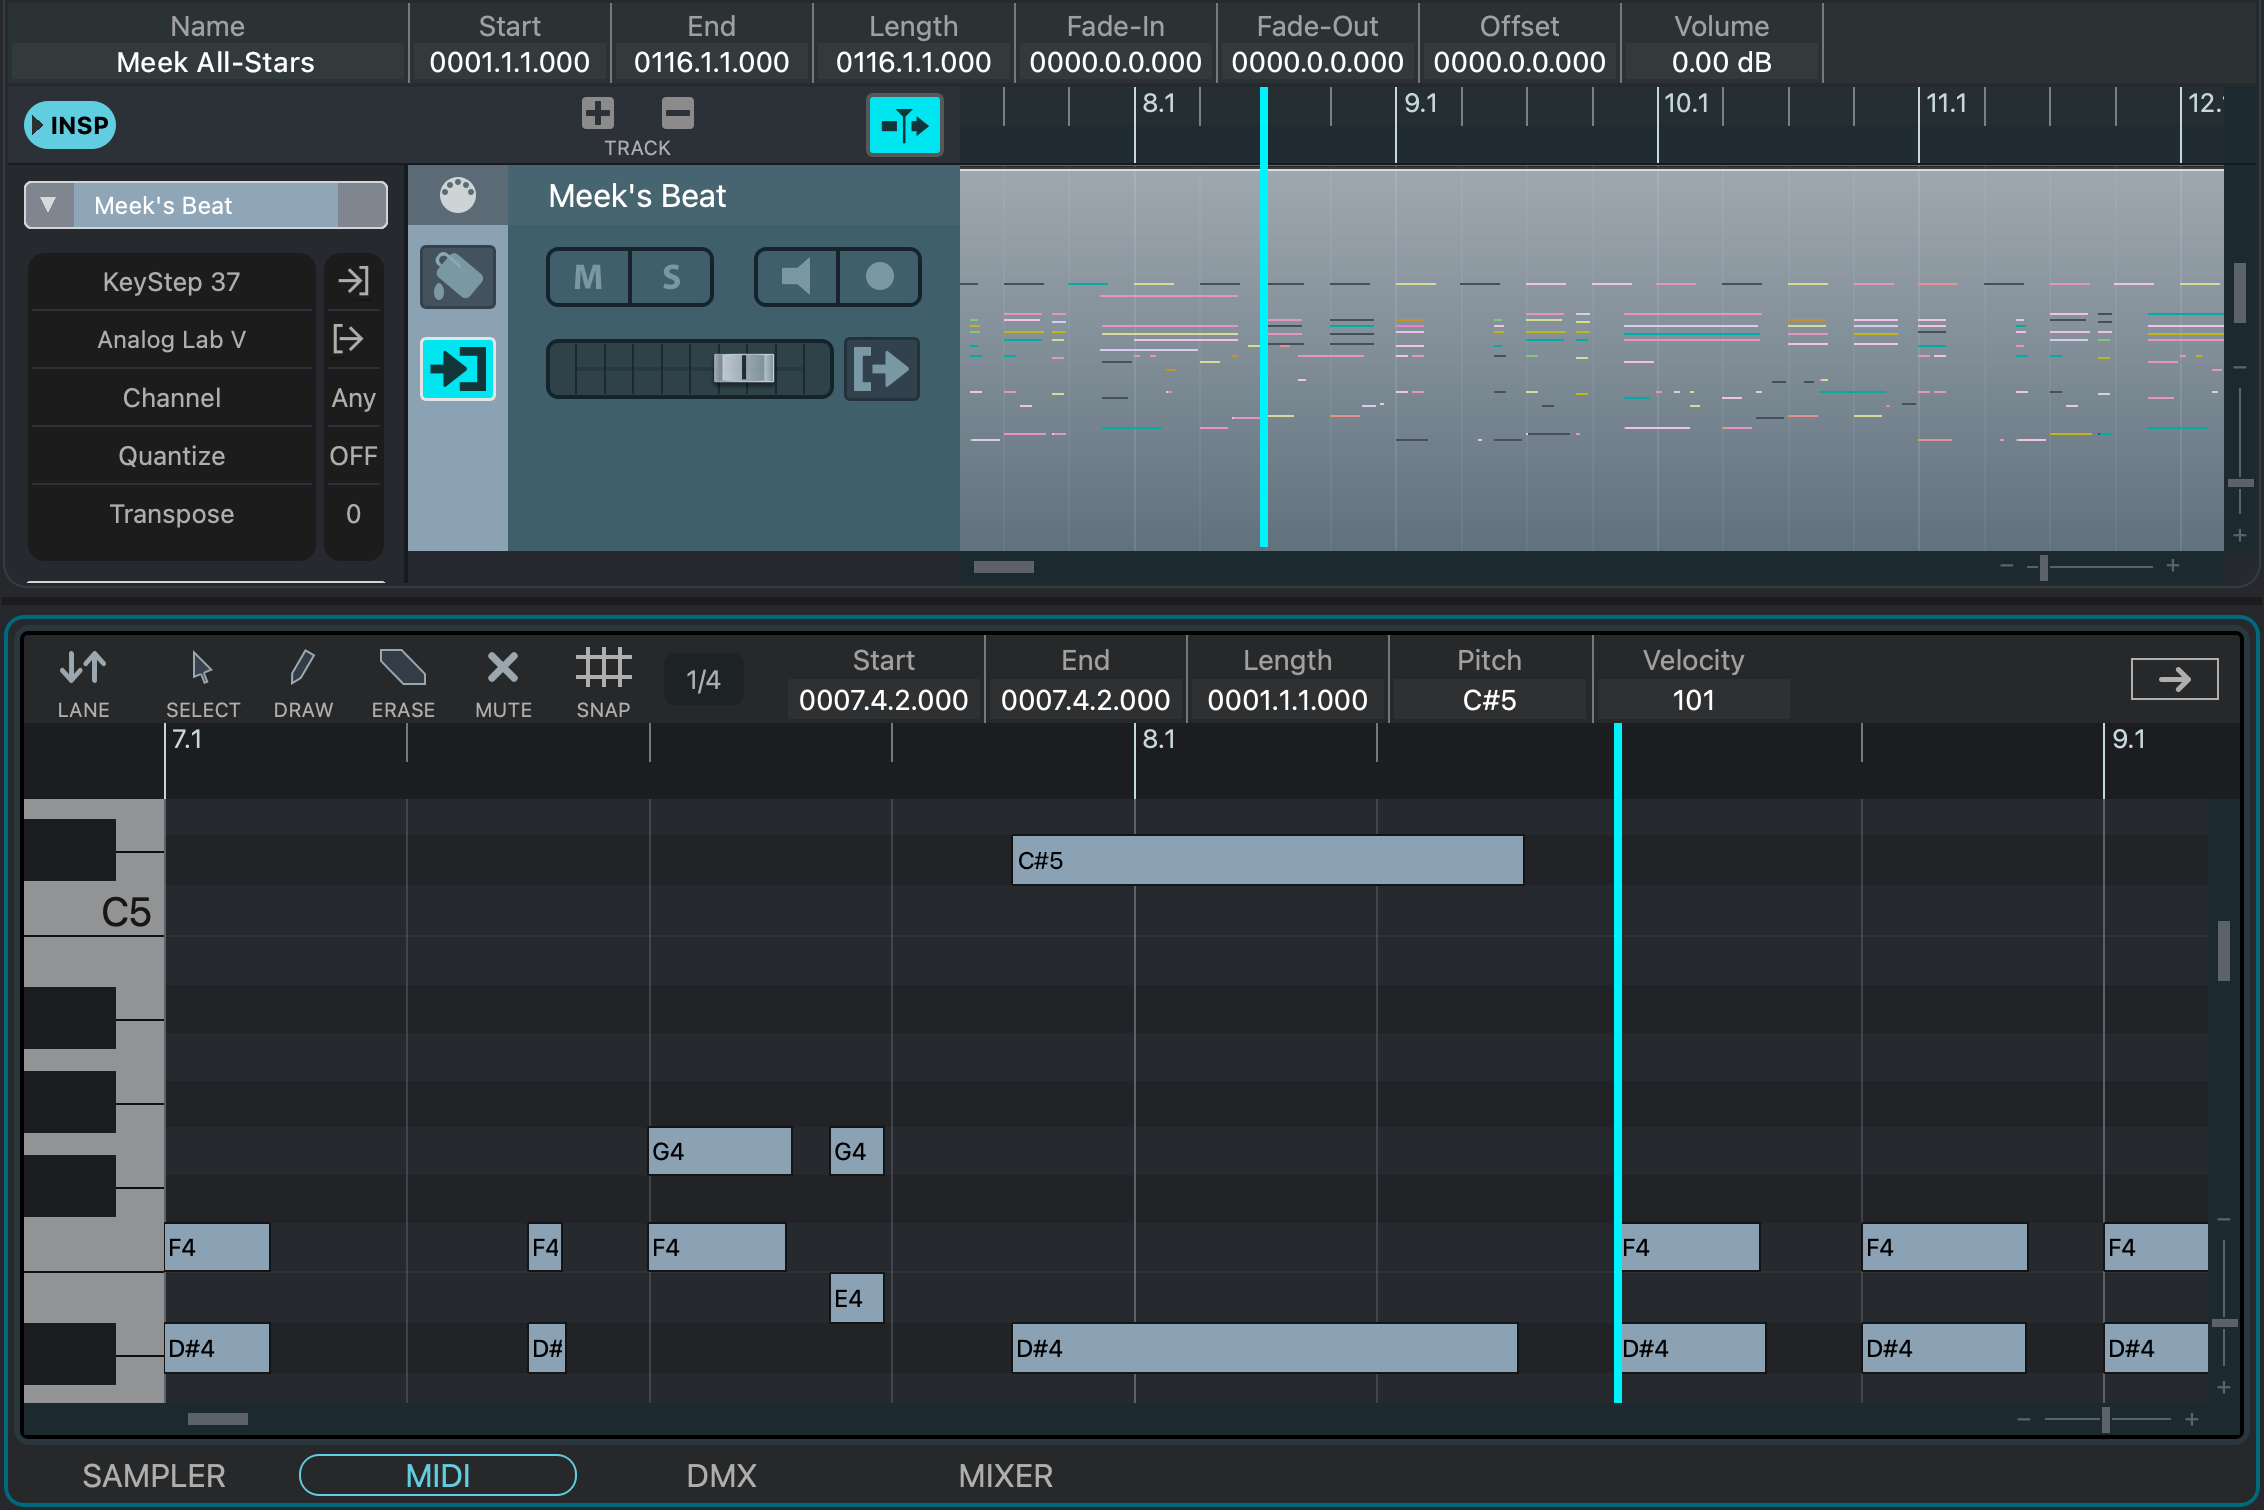
While DAWs are the most effective tool for editing MIDI as a composition, VST Live provides a MIDI sequencer streamlined for quick edits.
Introduction🔗
The MIDI Track Editor in VST Live is purpose-designed for editing existing Tracks according to the changes most needed within a live context. This allows the editor to be lightweight, yet provide the essentials features you need on the road.
Feature Overview🔗
If you’re familiar with MIDI editors, you’ll recognize familiar features and implementations:
- Create notes by performance, event list or step-time entry.
- See MIDI notes represented as pitch and duration on a piano roll.
- Independently modify the pitch, starting point, and duration of notes.
- Differentiate between MIDI notes on different channels.
- Adjust individual note data such as velocity, aftertouch and panning.
- Use visual and numeric controls to adjust values.
- Audition notes as you click on them.
Opening🔗
The MIDI Track Editor provides a working environment for individual Regions on tracks. If your Track has multiple regions, you must specify which Region you wish to edit. To do this, either:
- Double-click on the Region within the track. (The Lower Zone will automatically open.)
- Select the Region within the track. Then, manually open the Lower Zone, and select the MIDI editor.
Interface🔗
While using the MIDI Track Editor, the Track Editor View remains open to allow you access to each Track’s Regions. The two editors operate independent of each other, allowing multiple simultaneous viewing and access to your data. They automatically stay in synch with each other using the Transport’s Playhead.
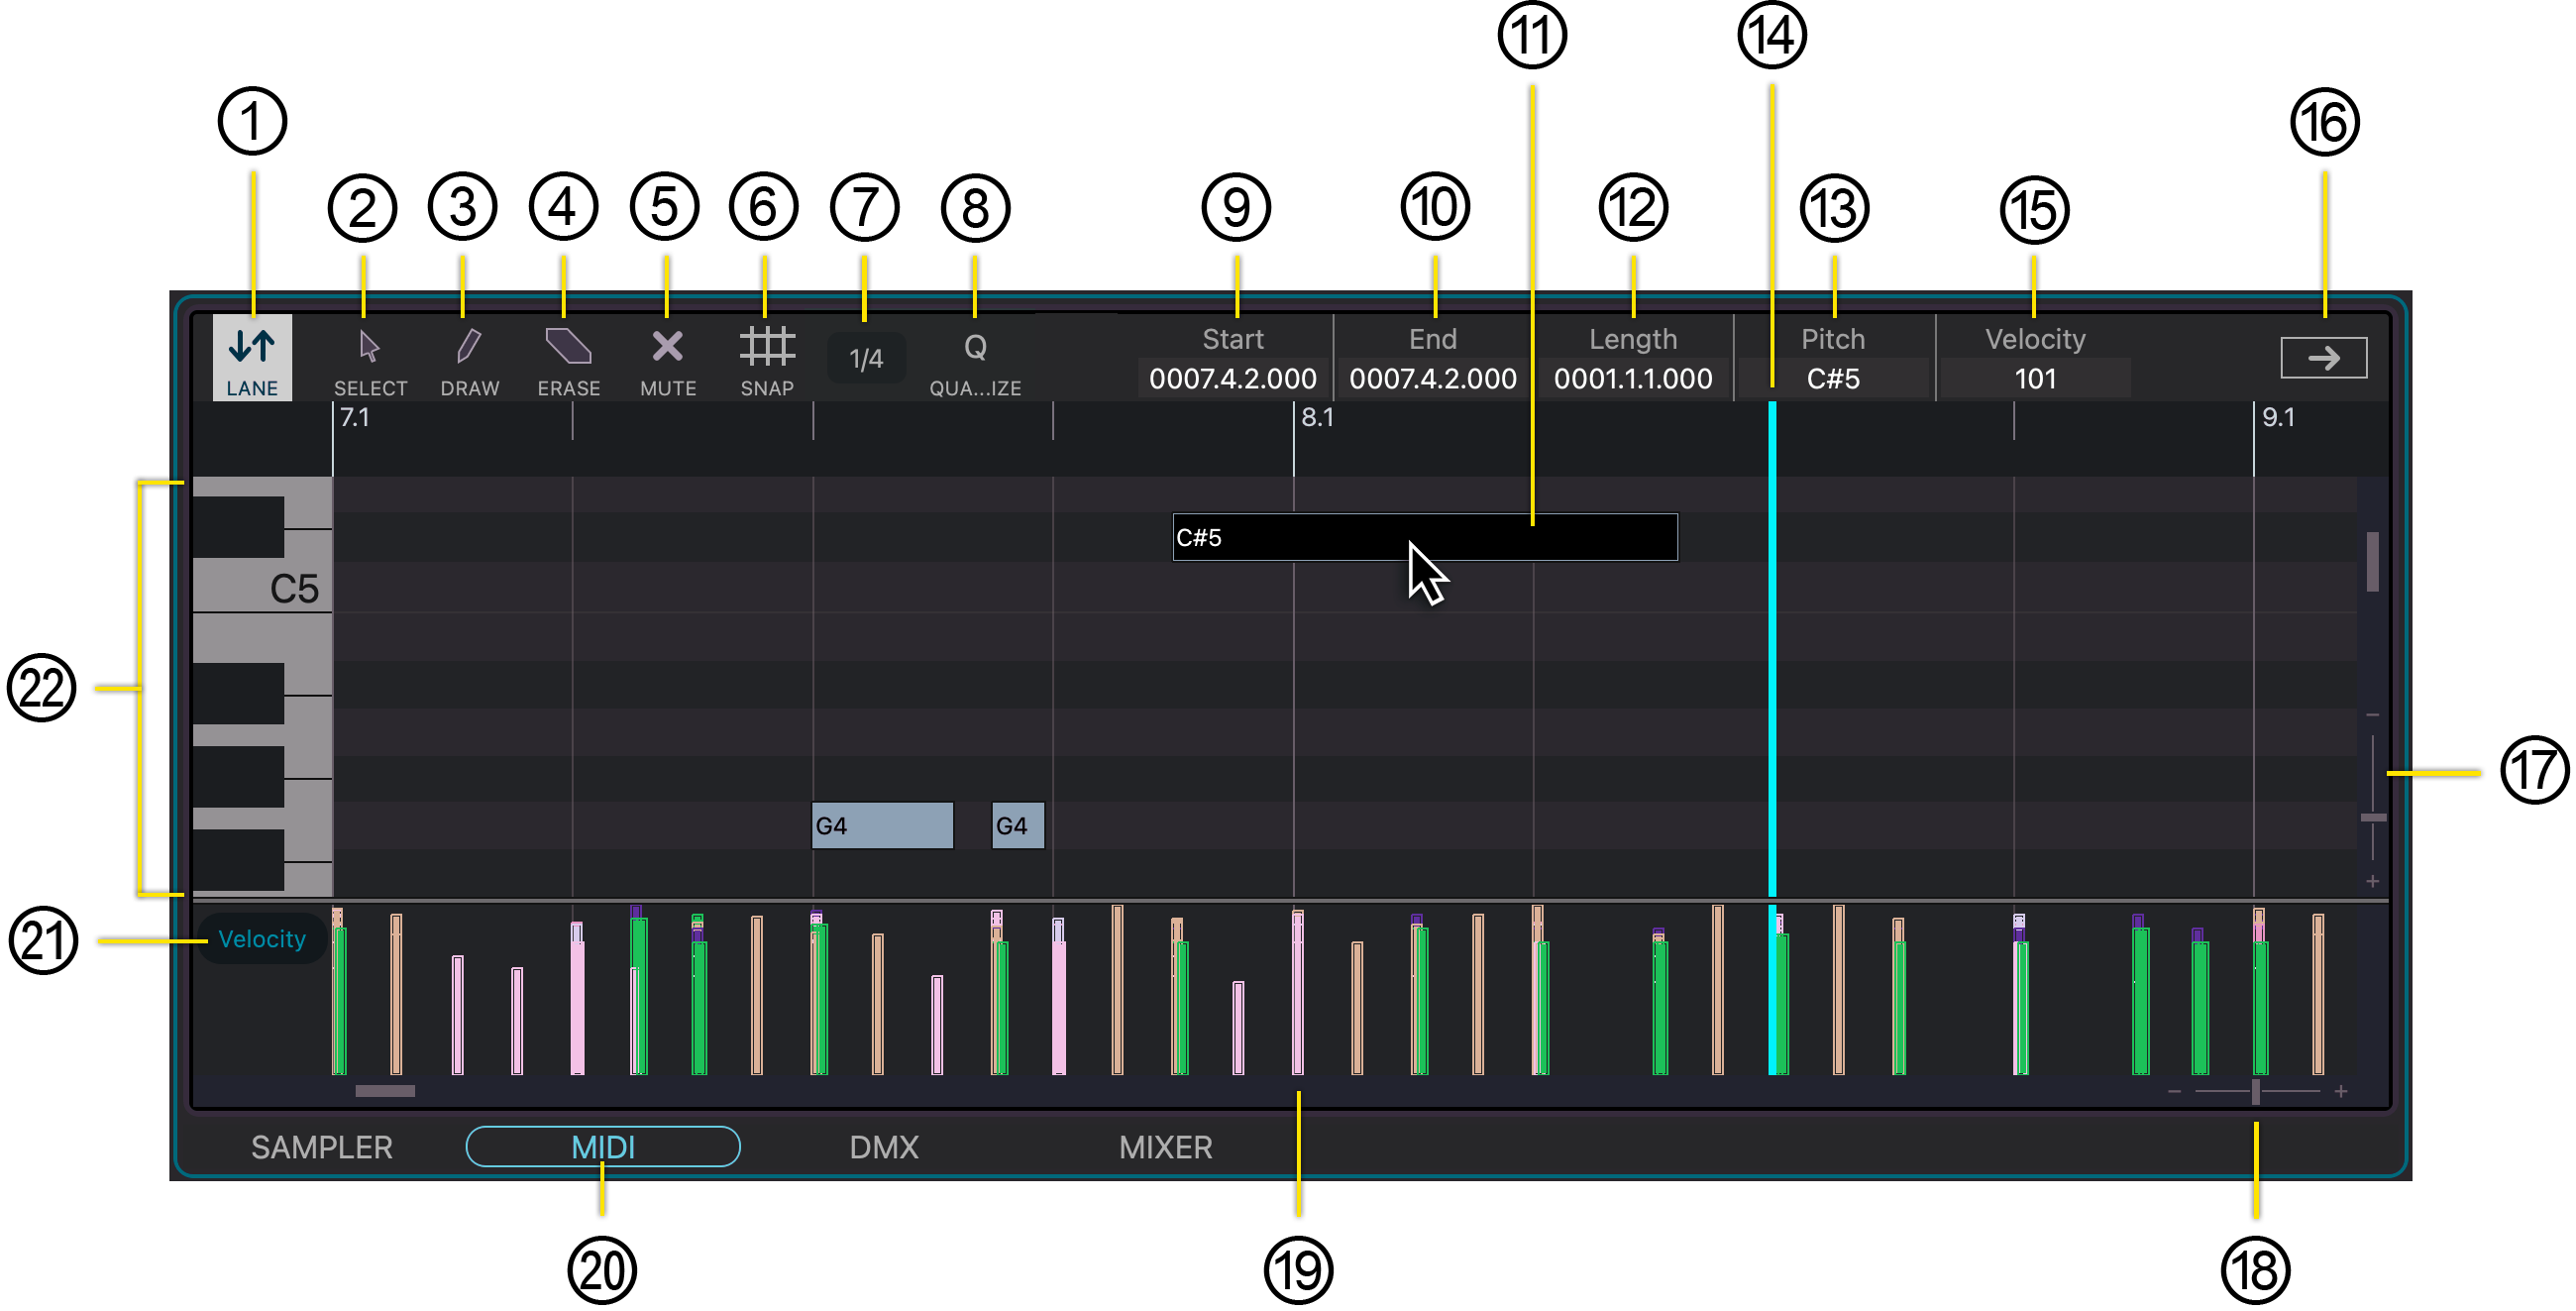
- Lane Toggle

Opens the Graph Zone beneath the MIDI editor.
- Selection Tool
Allows you to select specific MIDI notes.
- Draw Tool
Creates new MIDI notes.
- Erase Tool
Deletes specific MIDI notes.
- Mute Tool
Silences specific MIDI notes.
- Note Snap Toggle
Toggles the Note Snap function. When active, you can only drag MIDI notes to new start times which are a division of the Note Snap Value.
This Note Snap function is independent from the function in the Main Project Zone.
- Note Snap Value
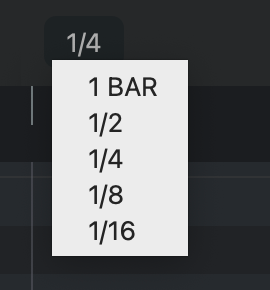
Determines the bar division for Note Snape and quantizing.
- To change it, click on the current value; a menu will be displayed.
- Note Start
If a MIDI note is selected, its starting position is displayed here. Double-click on the field to type a new value.
- Quantize
Clicking this button will quantize all the notes on the active MIDI track to the current note snap value.
- Note End
If a MIDI note is selected, its ending position is displayed here. Double-click on the field to type a new value.
- Selected MIDI Note
An example of a selected MIDI note.
- Length
If a MIDI note is selected, its length is displayed here. Double-click on the field to type a new value.
In changing the duration of MIDI note, it is not necessary to change the Note End and Length fields; if you adjust one, the other will be updated automatically.
- Note Pitch
If a MIDI note is selected, its pitch is displayed here. Double-click on the field to type a new value.
- Transport Playhead
The current position of the Transport’s Playhead.
Because the Main Project Zone (containing the Tracks View) and the MIDI editor have independent zoom levels, the Playhead will often appear at different positions on the screen.
- Note Velocity
If a MIDI note is selected, its velocity is displayed here. Double-click on the field to type a new value.
You can view the graphs of MIDI notes by toggling the Graph Zone lane.
- Window Tear-Off
Clicking this widget will create a new window containing the MIDI editor.
- Vertical Zoom
Zooms in or out of the MIDI note pitch grid.
- Horizontal Zoom
Zooms in or out of the Song’s bar grid.
- Note Graph
An example of a Note Graph corresponding to the selected MIDI note’s velocity.
- Lower Zone Selector
Selects which editor is active in the Lower Zone.
- Graph Zone Data Type

Displays the type of data displayed in the Graph Zone.
- To select what type of information is displayed, click the dark oval on the left-side of the Graph Zone.
- Piano Roll
The piano roll provides a visual representation of the pitches for notes displayed in the MIDI editor.
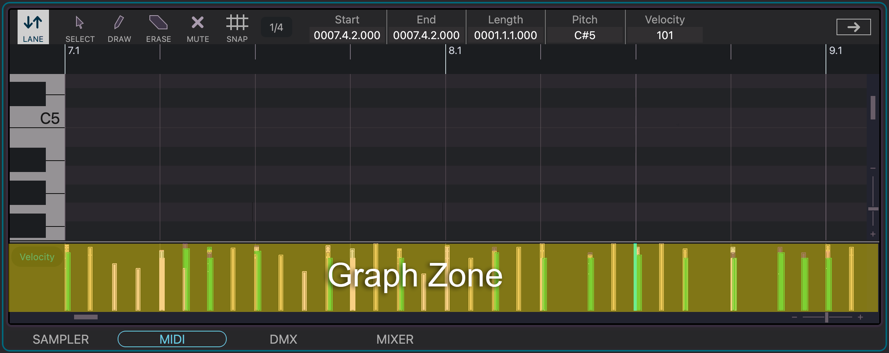
Graph Zone🔗
The Graph Zone is located below the MIDI Editor and lets you display and edit additional MIDI events.
You can choose between the following event types:
Velocity
Edits Note Velocities.

MIDI Controller (CC)
Edits MIDI Controller Data
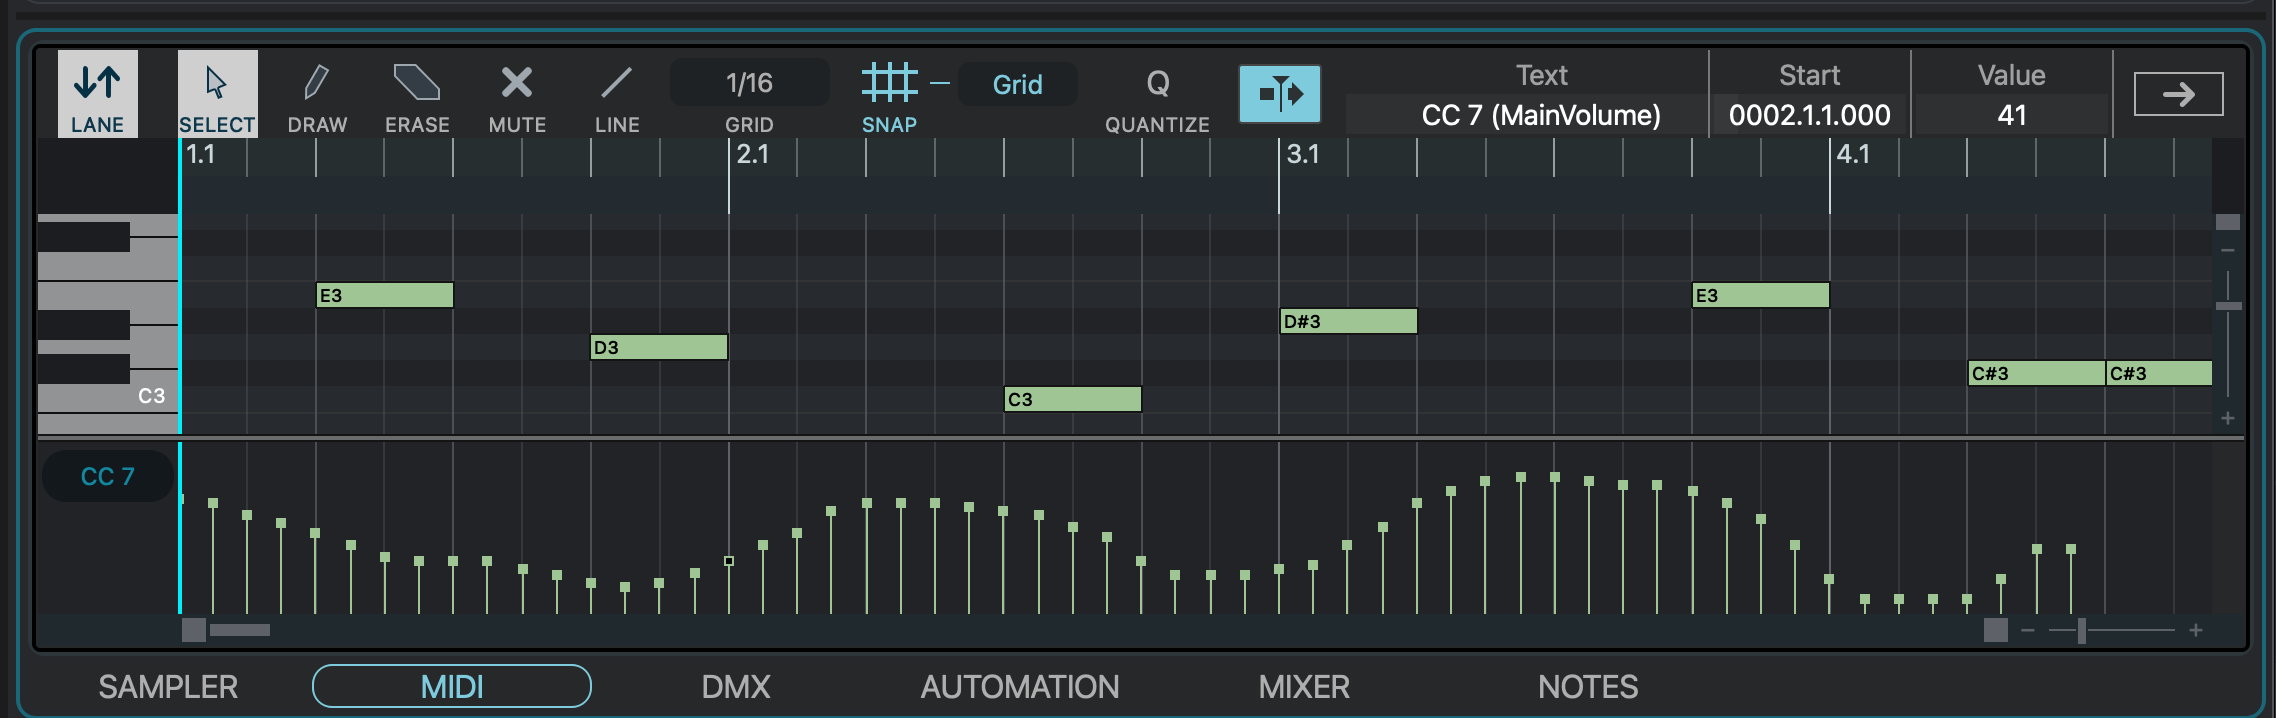
Controller numbers range from CC 0 to CC 127. Only one controller can be displayed and edited at a time.
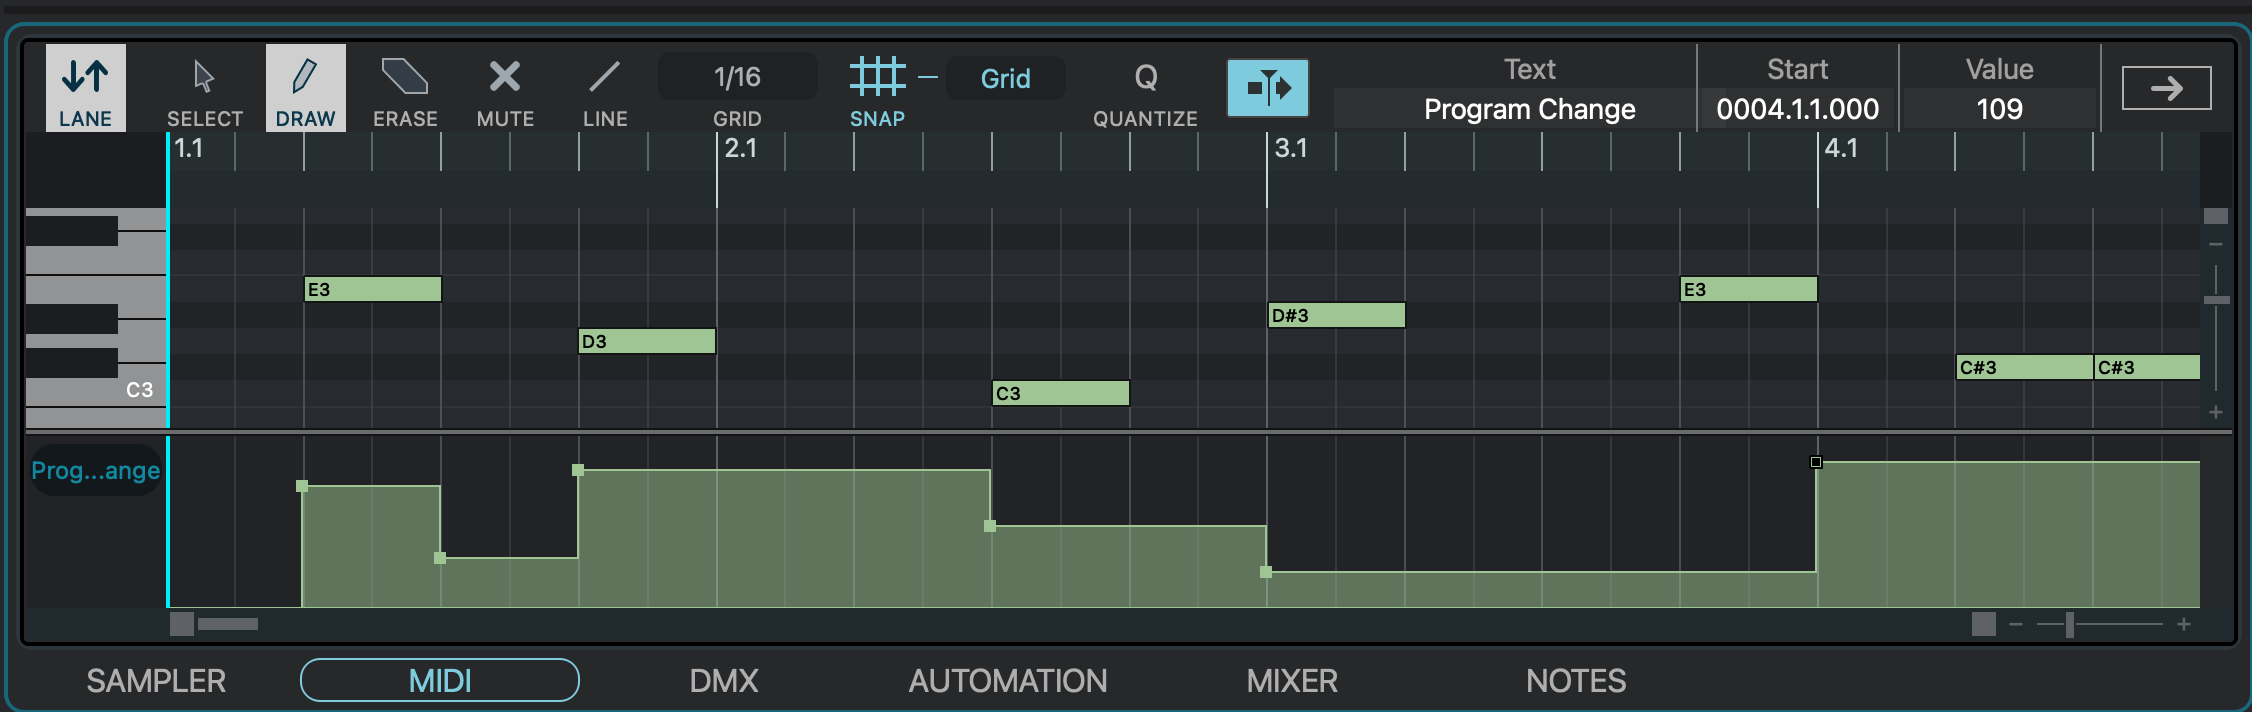
Program Change
Edits Program Change Messages.
System Exclusive (SysEx)
Edits SysEx messages.
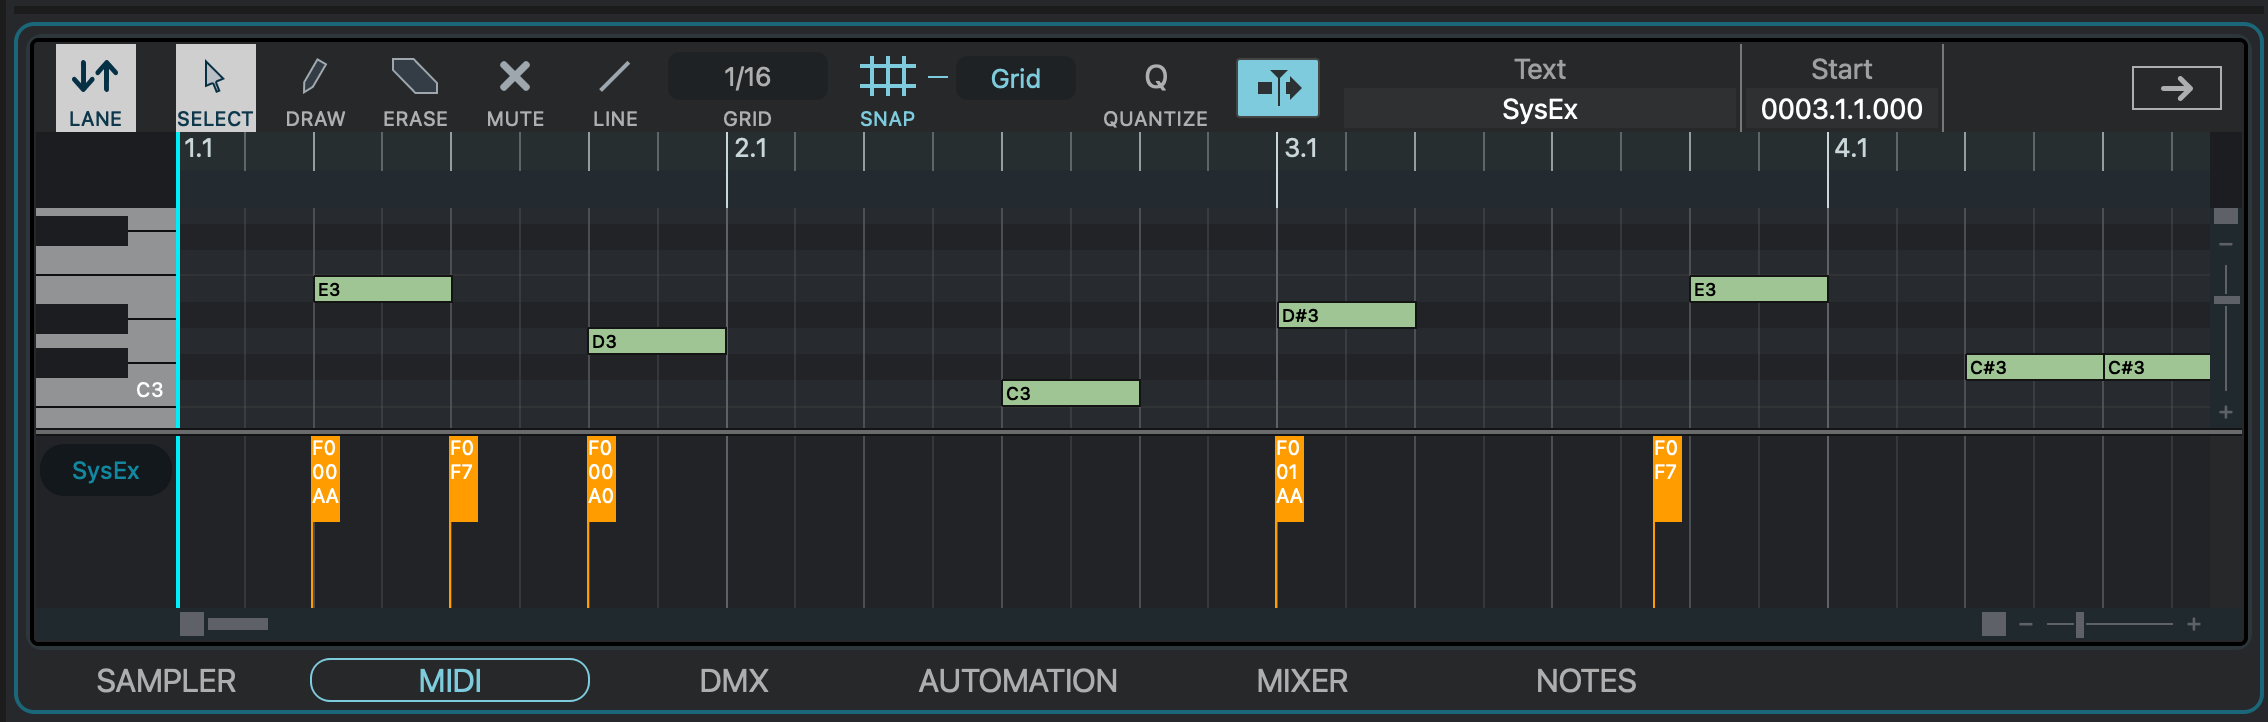
To edit a SysEx event, double-click the event in the Graph Zone. A dialog opens where you can enter or modify the SysEx data.

Select the desired event type to display its data in the Graph Zone.
MIDI List Editor🔗
The Event Editor provides precise, alphanumeric display and editing capabilities for MIDI data in a vertical, linear format.
Timing will be displayed and edited as either beats or time, depending on what you have chosen for VST Live.
Accessing🔗
The MIDI List Editor is a floating window.
- Open the MIDI List Editor by selecting Edit > MIDI List Editor.
- In the Tracks View, select the MIDI Track you wish to edit.
If you cannot view the MIDI Editor after selecting a Track, ensure the MIDI Editor window is in front of the Project window.
Interface🔗
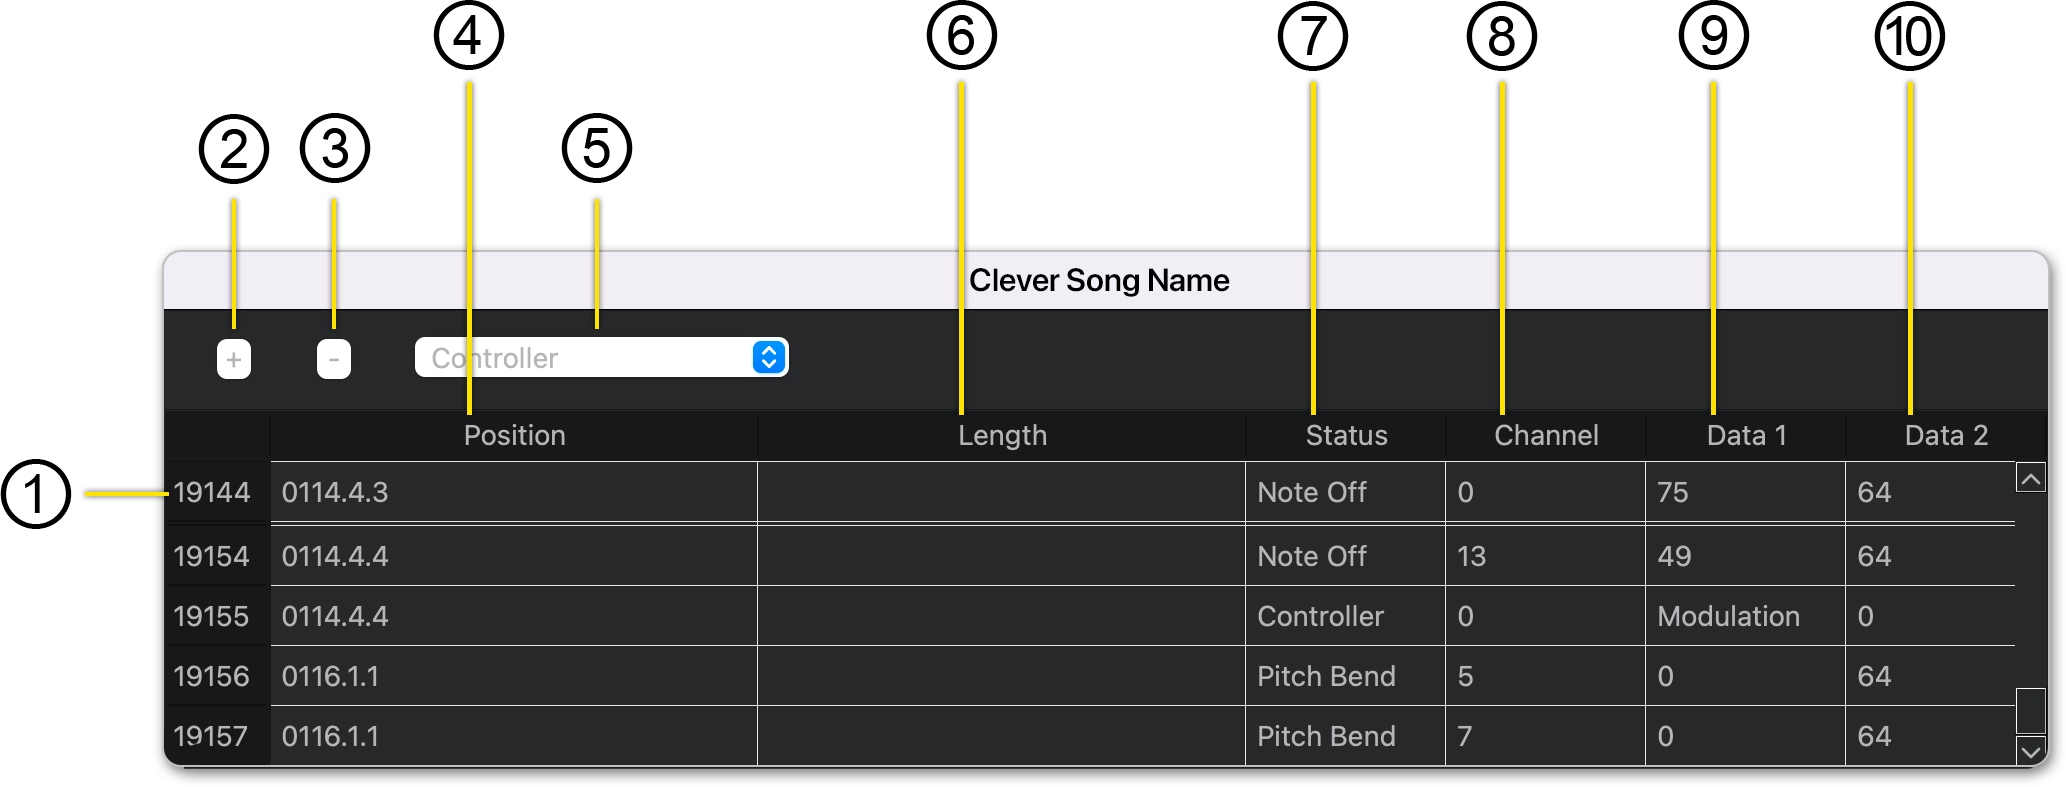
- Event ID
Every MIDI Event has an incremental ID assigned by VST Live. This number is for your reference inside the editing window; it has no function outside of the MIDI Event Editor.
Tip
Use the Event ID to ensure that you are editing the correct MIDI Event within a long list of similar Events.
- Add MIDI Event
Click this button to add a MIDI Event. The event will be added at the Playhead’s current location.
Tip
You can view the Playhead’s current position in the Tracks View.
- Erase Tool
Deletes the selected MIDI Event.
- Event Position
Indicates the position on the Timeline when the MIDI event occurs. MIDI Event’s starting time. To the change it, click in this field.
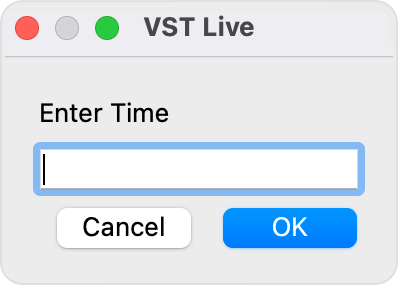
The Time dialogue box will appear, prompting you to input a new starting time for the MIDI Event.
Some MIDI Events, such as notes and sustain pedal actions, have starting and ending events. Other Events, such as continuous controller data and program changes, only have starting positions.
- Event Type
Allows you to specify the event type when creating a new event.
To create a new Event and choose the type, first choose the type in this pop-up window. Then click the plus icon button to create the event.
- Event Length
For Events with an ending Event, the Event’s length can be viewed and edited in this column.
To edit the Event length, click in the table cell corresponding to the event. A Time dialogue will appear for you to enter the duration time into.
After changing the duration of a starting Event, VST Live will automatically update the ending Event.
- Event Type (Status)
The type of MIDI Event is displayed here.
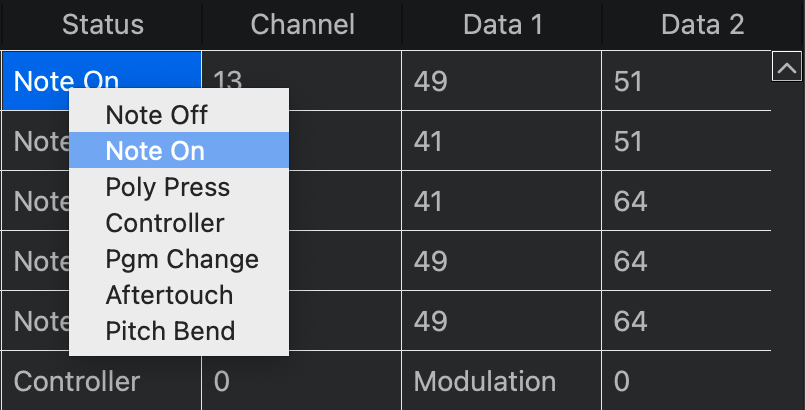
To change the Event type, click inside the cell.
- MIDI Channel
The MIDI channel of the Event.
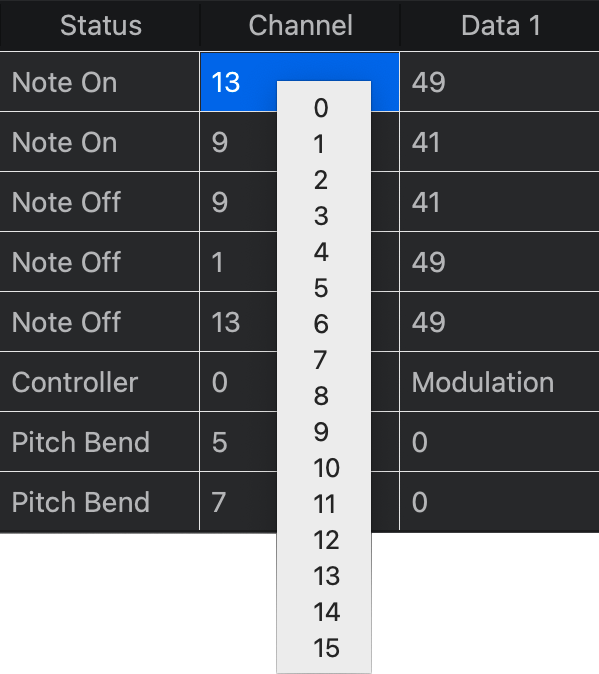
To change the Event’s MIDI channel, click inside the cell. A pop-menu will appear from which you may choose a new MIDI channel.
- Data 1 Field
For MIDI Events that have associated data, the information is displayed here.
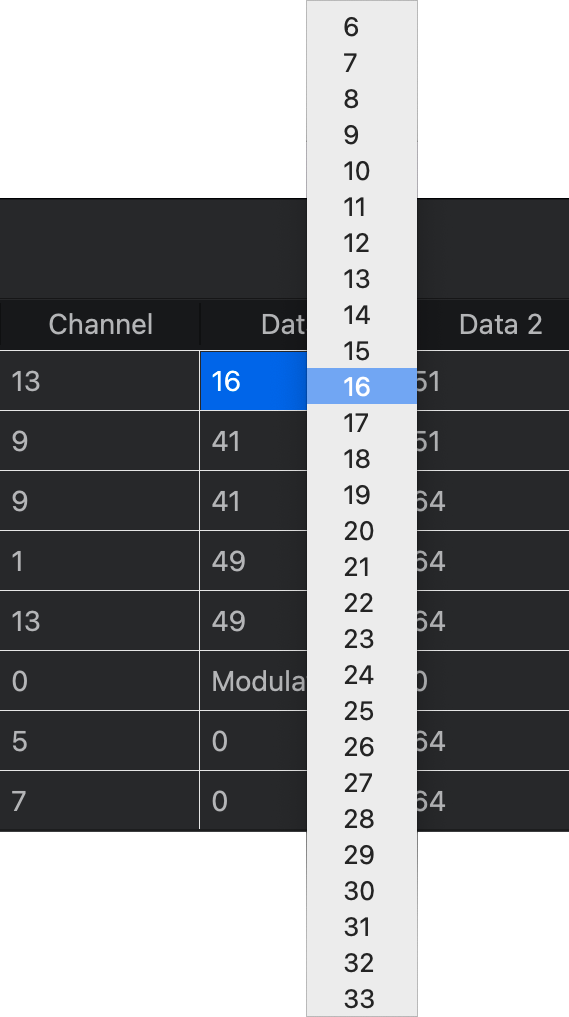
To change the data, click inside the cell. A pop-menu will appear from which you may choose a new value.
- Data 2 Field
If a MIDI Event has two associated data fields, the second field is displayed here.
To change the data, click inside the cell. A pop-menu similar to that of Data 1 Field will appear from which you may choose a new value.
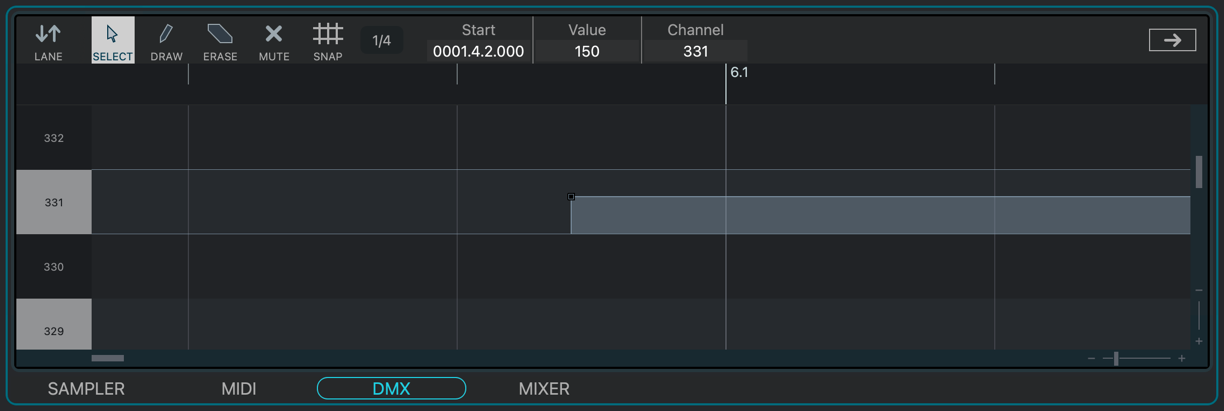
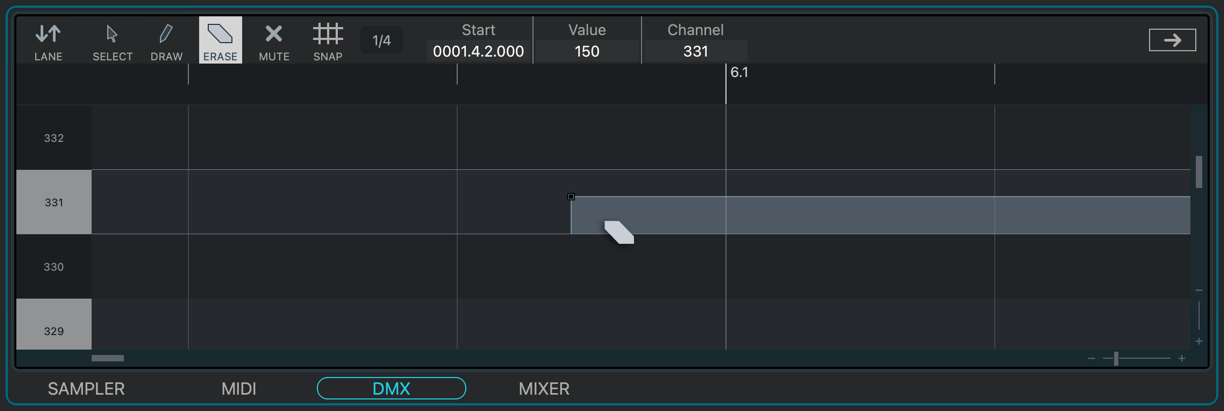
DMX Track Editor🔗
VST Live’s DMX editor is a powerful, industry-exclusive tool for sequencing DMX commands.
Opening🔗
The DMX editor provides a working environment for individual regions on DMX tracks. If your track has multiple regions, you must specify which region you wish to edit. To do this, either:
- Double-click on the region within the track. (The Lower Zone will automatically open.)
- Select the Region within the Track. Then, manually open the Lower Zone, and select the DMX data editor.
Interface (Track)🔗
The Track editor View remains open while using the DMX data editor. This allows you to select the specific DMX Region you wish to edit. The two editors operate independent of each other, and automatically synch using the Transport’s Playhead.
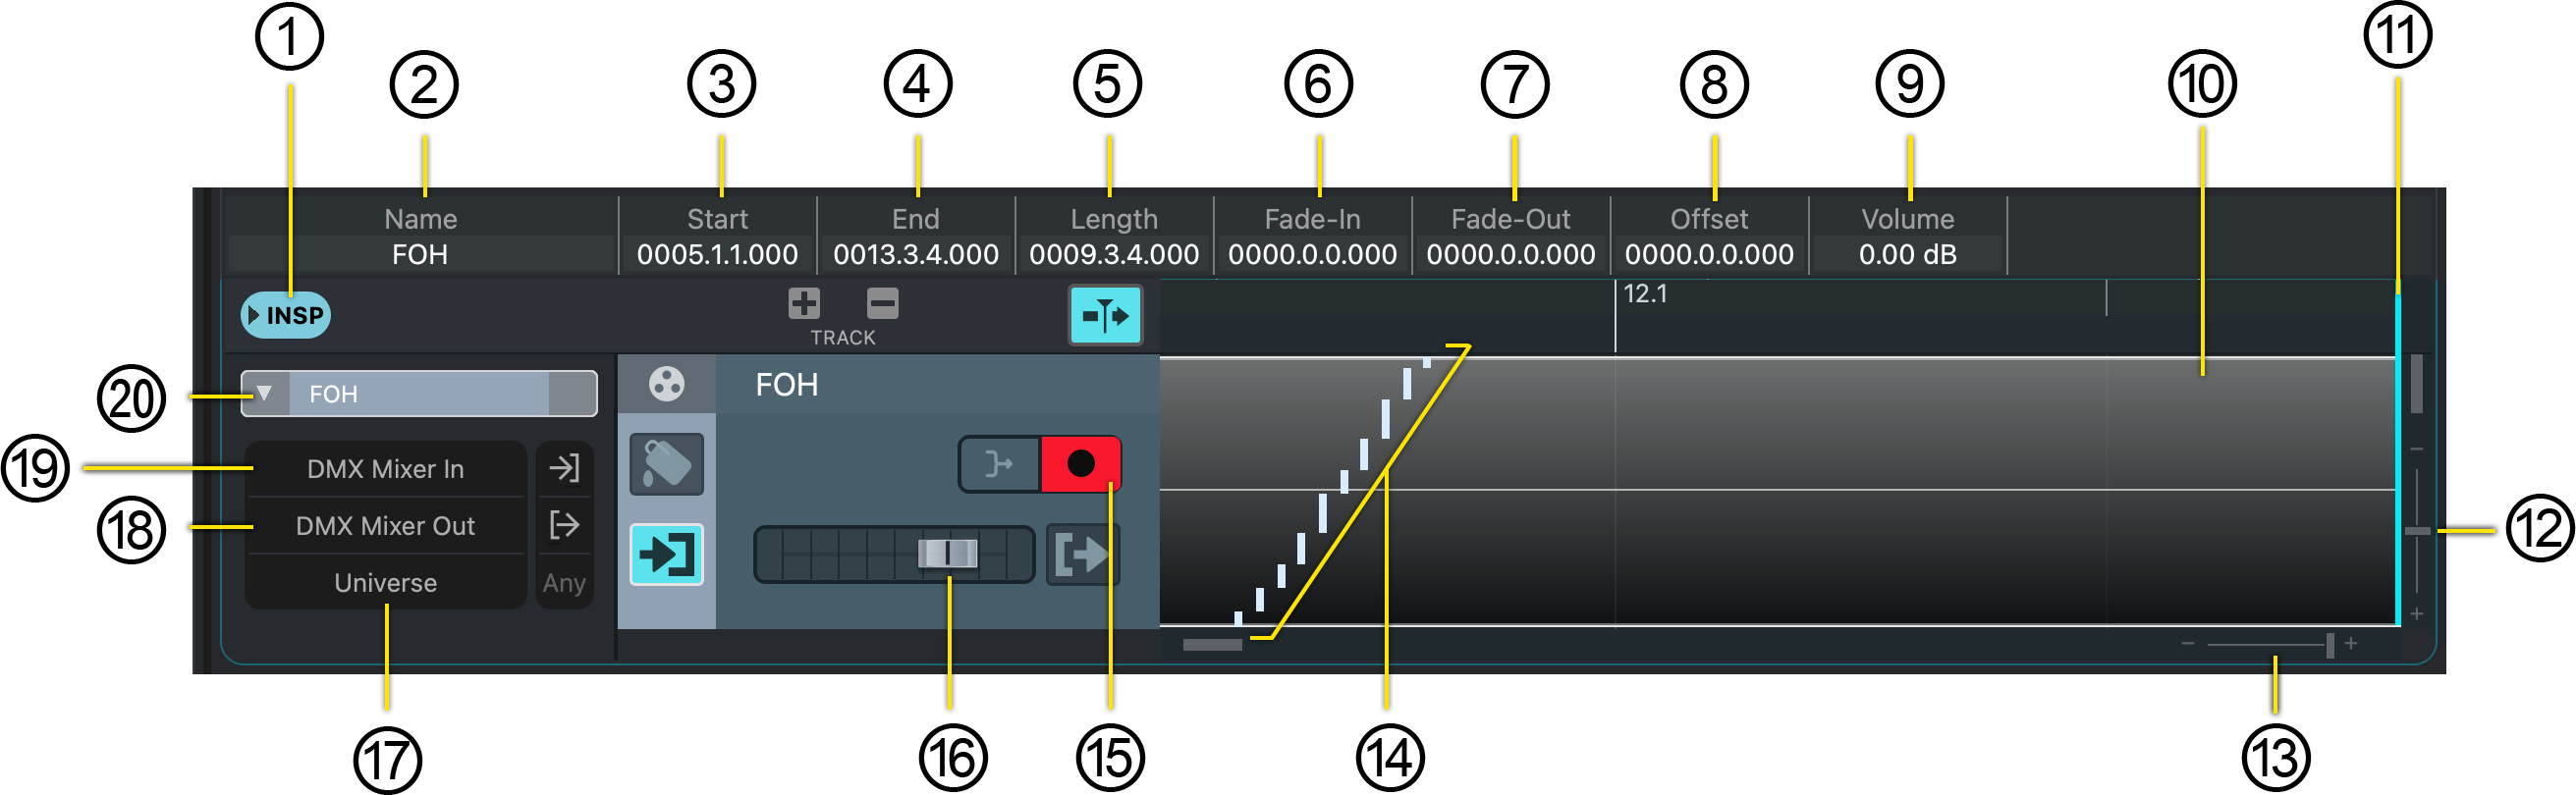
- Inspector Toggle
Toggles the Inspector for the DMX track. The Inspector displays and provides access to the tracks:
- Input Source
- Output destination
- DMX universe
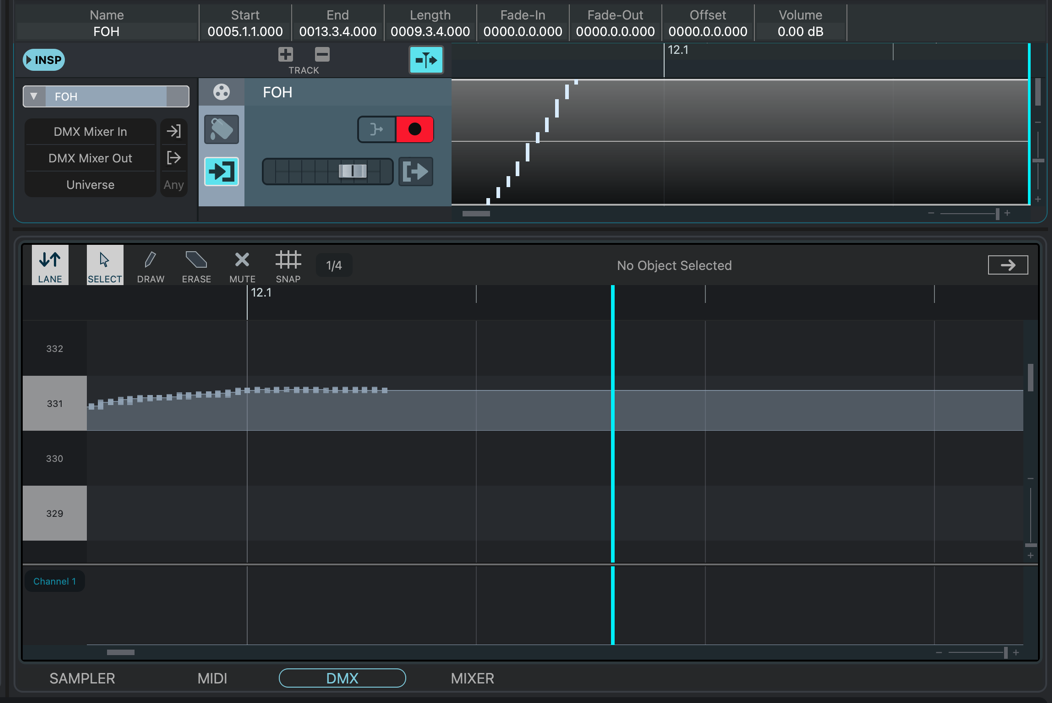
- Track Name
The name of the Track.
- (Selected) Region Start
Double-click in the field to change.
- (Selected) Region End
Double-click in the field to change.
- (Selected) Region Length
Double-click in the field to change.
- (Selected) Region Fade-In
A (non-destructive) master fade-in to the starting values of all DMX devices on the Track. Double-click in the field to change.
- (Selected) Region Fade-Out
A (non-destructive) master fade-out to the starting values of all DMX devices on the Track. Double-click in the field to change.
- (Selected) Region Offset
This value is added to the region’s Region Start Value to determine when the Region begins.
- (Selected) Static Region Scaling Factor
The value of all DMX data (i.e., brightness) on the track is (non-destructively) scaled by this amount.
- Active (Selected) Region
An example of a Region selected for editing in the Lower Zone using the DMX data editor.
- Playhead
The current position of the Transport Playhead in Main Project Zone Window.
- Vertical Zoom
Zooms in or out of the MIDI note pitch grid.
- Horizontal Zoom
Zooms in or out of the Song’s bar grid.
- DMX Data Preview
A thumbnail view of the data in a DMX track Region.
- Record Enable Indicator Switch
Allows incoming DMX data to be recorded in real-time to the track.
- Dynamic Scaling Factor
This fader (non-destructively) scales the value (i.e., brightness) corresponding to all DMX data on the track.
- DMX Universe Selector
If you are using more than one DMX universe, select the desired one here.
- DMX Track Output Destination
Displays and allows the selection of the DMX track’s output (e.g., dimmer packs, VST Live’s Visualiser, VST Live’s DMX Mixer).
- DMX Track Source
Displays and allows the selection of the DMX track’s incoming data source (e.g., external DMX lighting board, VST Live’s DMX Mixer) for real-time recording.
- Inspector Disclosure Triangle
Toggles between the display of the Inspector’s data fields.
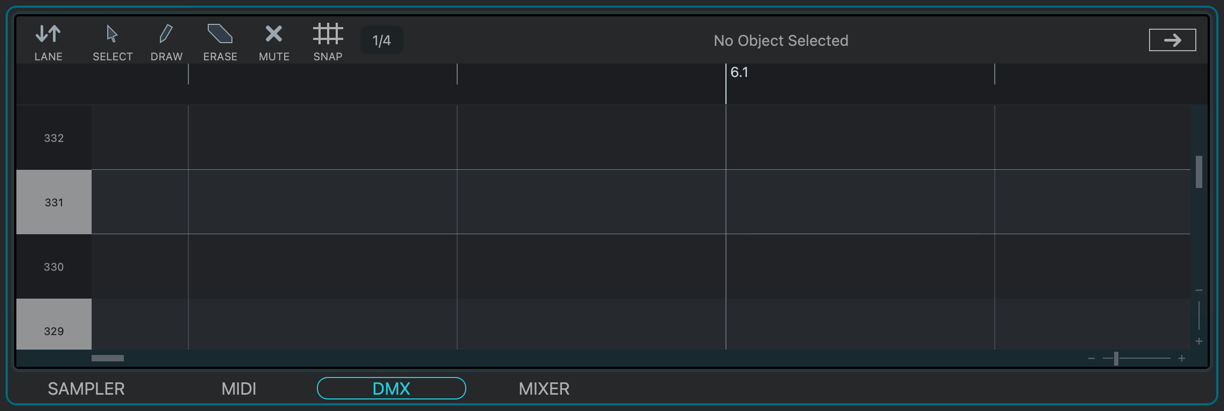
Interface (Track Editor)🔗
The DMX editor displays and allows access to the DMX data on the Region selected above in the Tracks View.

- Lane Toggle
Opens the Graph Zone beneath the DMX editor.
The Graph Zone contains visual graphs that display information about individual DMX data points.
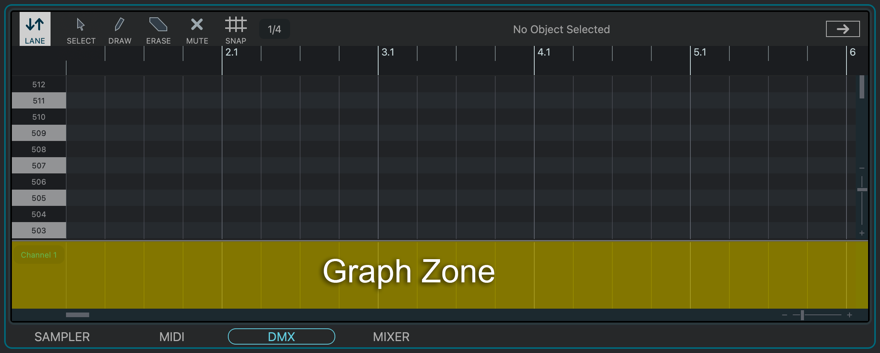
- Selection Tool
Allows you to select specific DMX data points.
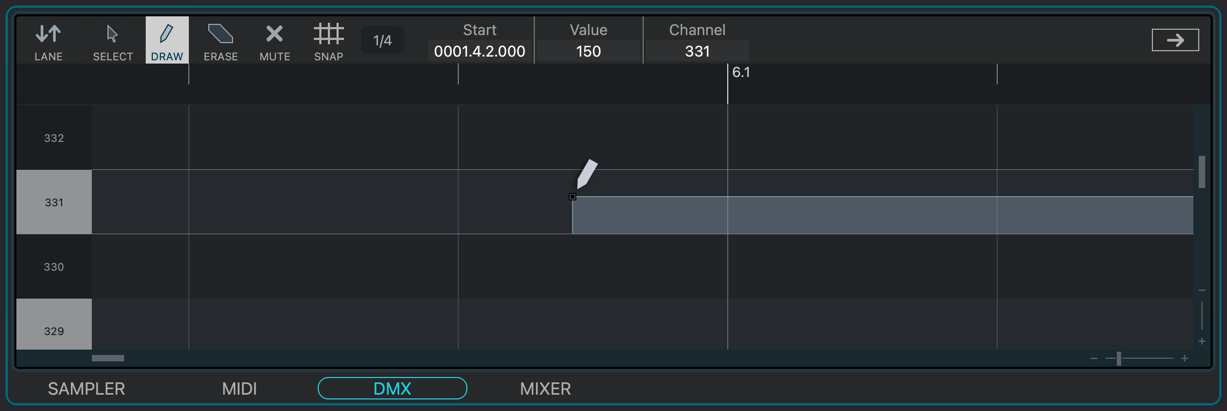
- Draw Tool
Creates new DMX data points.
- Erase Tool
Deletes specific DMX data points.
- Mute Tool
Deactivates (but does not delete) specific DMX data points.
- Data Point Snap Toggle
Toggles the Snap function. When active, you can only drag data points to new start times which are a division of the Snap Value.
This Note Snap function is independent from the function in the Main Project Zone.
- Data Point Snap Value
Determines the bar division for data points to snapping and quantinization.
- To change it, click on the current value; a menu will be displayed.
- Quantize
Clicking this button will quantize DMX data points.
- DMX Data Point (Example)
An example of a single DMX data point.
- Transport Playhead
The current position of the Transport’s Playhead.
- Data Point Variables Pane
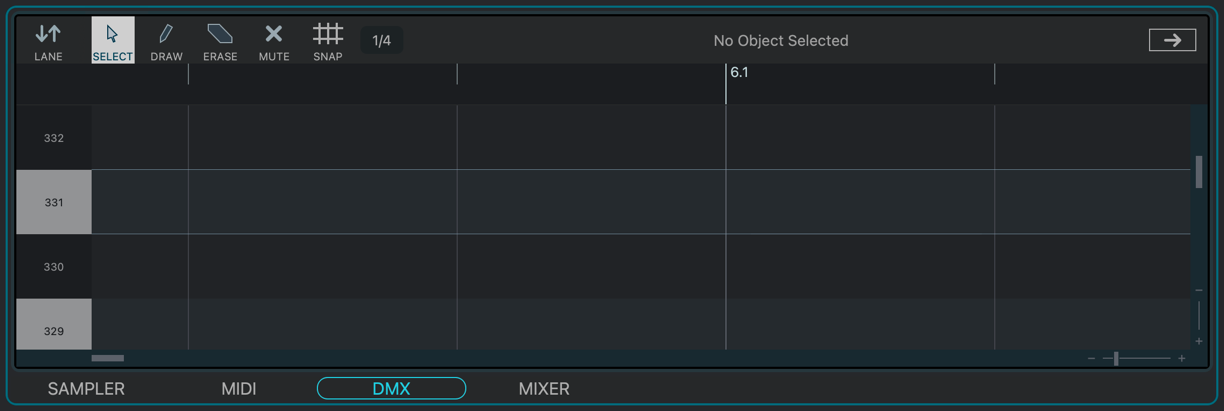
When a DMX data point is selected, its relevant variables are displayed in this area. Otherwise, the message “No Object Selected” is displayed.
- Active DMX Data
Indicates active DMX data (i.e., dimmer packs remain active).
- Window Tear-Off
Clicking this widget will create a new window containing the DMX editor.
- Vertical Zoom
Zooms in or out of the DMX channel number grid.
- Horizontal Zoom
Zooms in or out of the Song’s bar grid.
- Lower Zone Selector
Selects which editor is active in the Lower Zone.
- Graph Zone DMX Channel Selector
To adjust the channel:
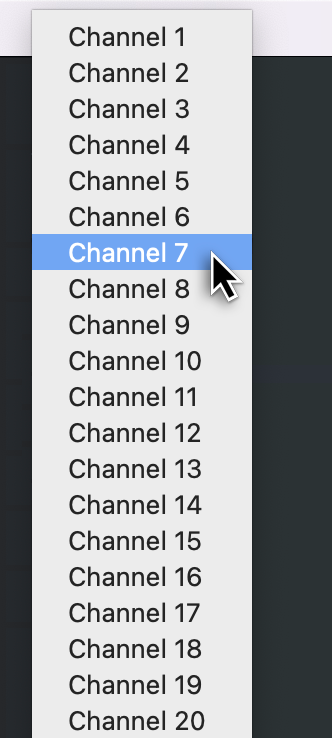
- Click on the corresponding dark oval.
- Choose your desired channel from the pop-up menu.
- DMX Channel Number
Shows the DMX channel number for the corresponding DMX data.
Editing DMX Data🔗
The editing of DMX data is similar to editing MIDI data.
Creating a New DMX Data Point
Use the Draw tool to create new data points.
- Starting
Choose an empty section of the canvas
- Setting the Brightness
Using the Draw tool, click in the channel you wish, at the level (i.e., brightness) you wish.
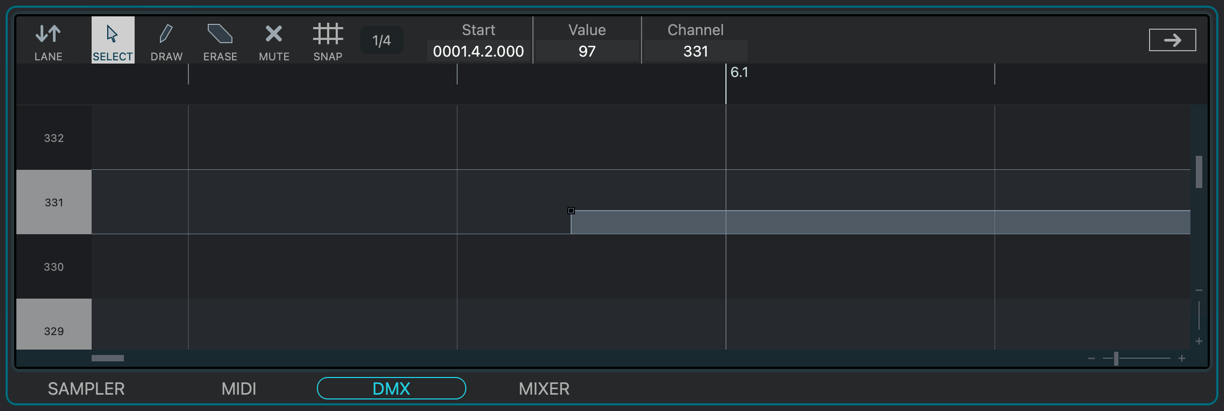
Modifying an Existing DMX Data Point
Modify data points with the Arrow tool.
- Starting
Scroll to the area of the canvas containing the data point you wish to modify. The data point is grey, indicated that it is not (yet) selected.

- Choosing the Data Point
Using the Arrow tool, choose your desired data point by drawing a selection box around it.
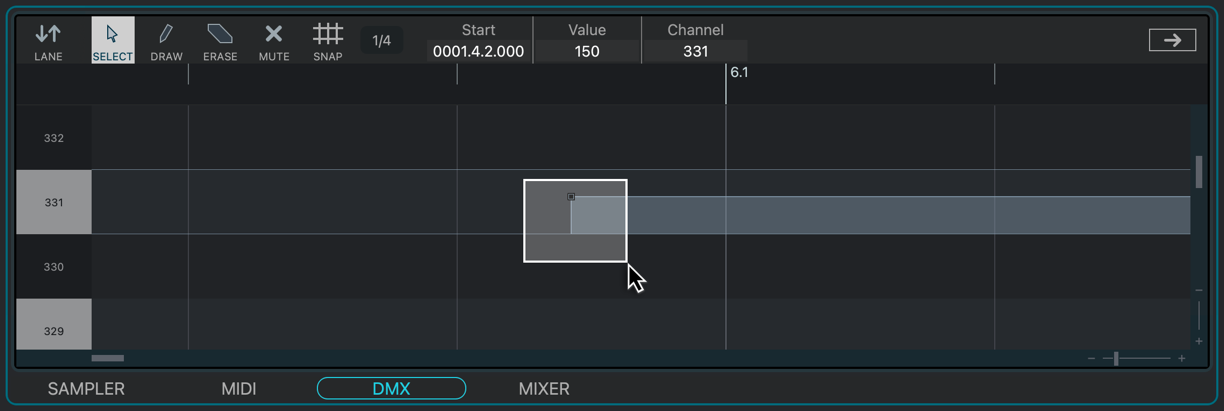
- Selection Indication
The data point is now black, indicating it is selected.
- Modification
Double-click in the field you wish to modify. (In this example, it is the “Value” field.)
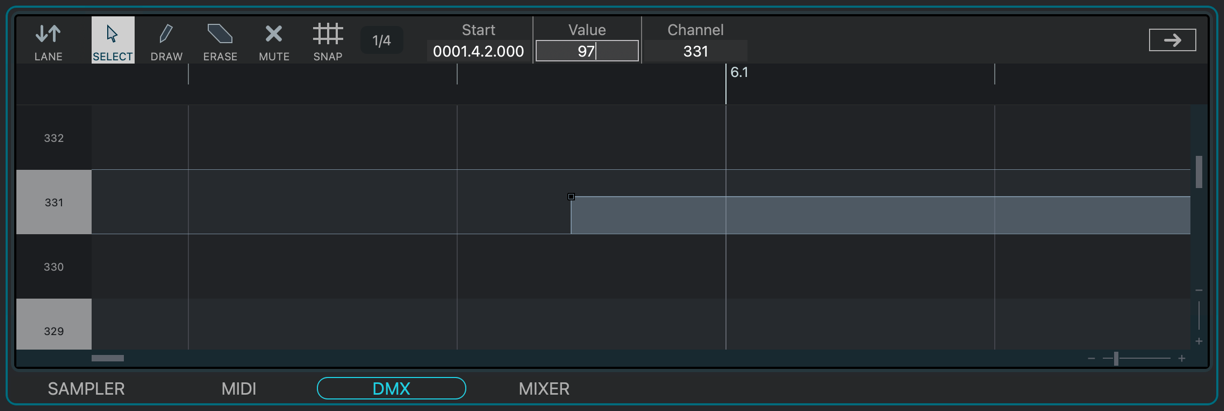
- Confirming the Modification
Press RETURN; the display will reflect the change you have made.
Deleting an Existing Data Point
Use the Eraser tool to delete data points.
- Starting Point
Scroll to the area of the canvas containing the data point you wish to delete. The data point is grey, indicated that it is not (yet) selected.
- Choosing Your Data Point
Using the Arrow tool, choose your desired data point by drawing a selection box around it.
- Selection Indication
The data point is now black, indicating it is selected.
- Erasing the Data Point
Using the Eraser tool, click anywhere in the data point’s active area.
- Confirmation
The data point is now removed.
Disabling an Existing Data Point
Use the Mute tool to disable data points.
- Starting
Scroll to the area of the canvas containing the data point you wish to disable.
- Choosing the Data Point
Using the Arrow tool, choose your desired data point by drawing a selection box around it.
- Selection Indication
The data point is now black, indicating it is selected.
- Muting the Data Point
Using the Mute tool, click anywhere in the data point’s active area.
- Confirmation
The data point is now white, indicating it has been disabled.

DMX List Editor🔗
The DMX List Editor provides precise display and editing capabilities for DMX Events in a vertical, linear format.
Like the MIDI List Editor, timing will be displayed and edited as either beats or time, depending on how you have configured VST Live.
Accessing🔗
The DMX List Editor is a floating window.
- Open the DMX List Editor by selecting Edit > DMX List Editor.
- In the Tracks View, select the DMX Track you wish to edit.
If you cannot view the DMX List Editor’s window after selecting a Track, ensure the DMX List Editor window is in front of the Project window.
Interface🔗
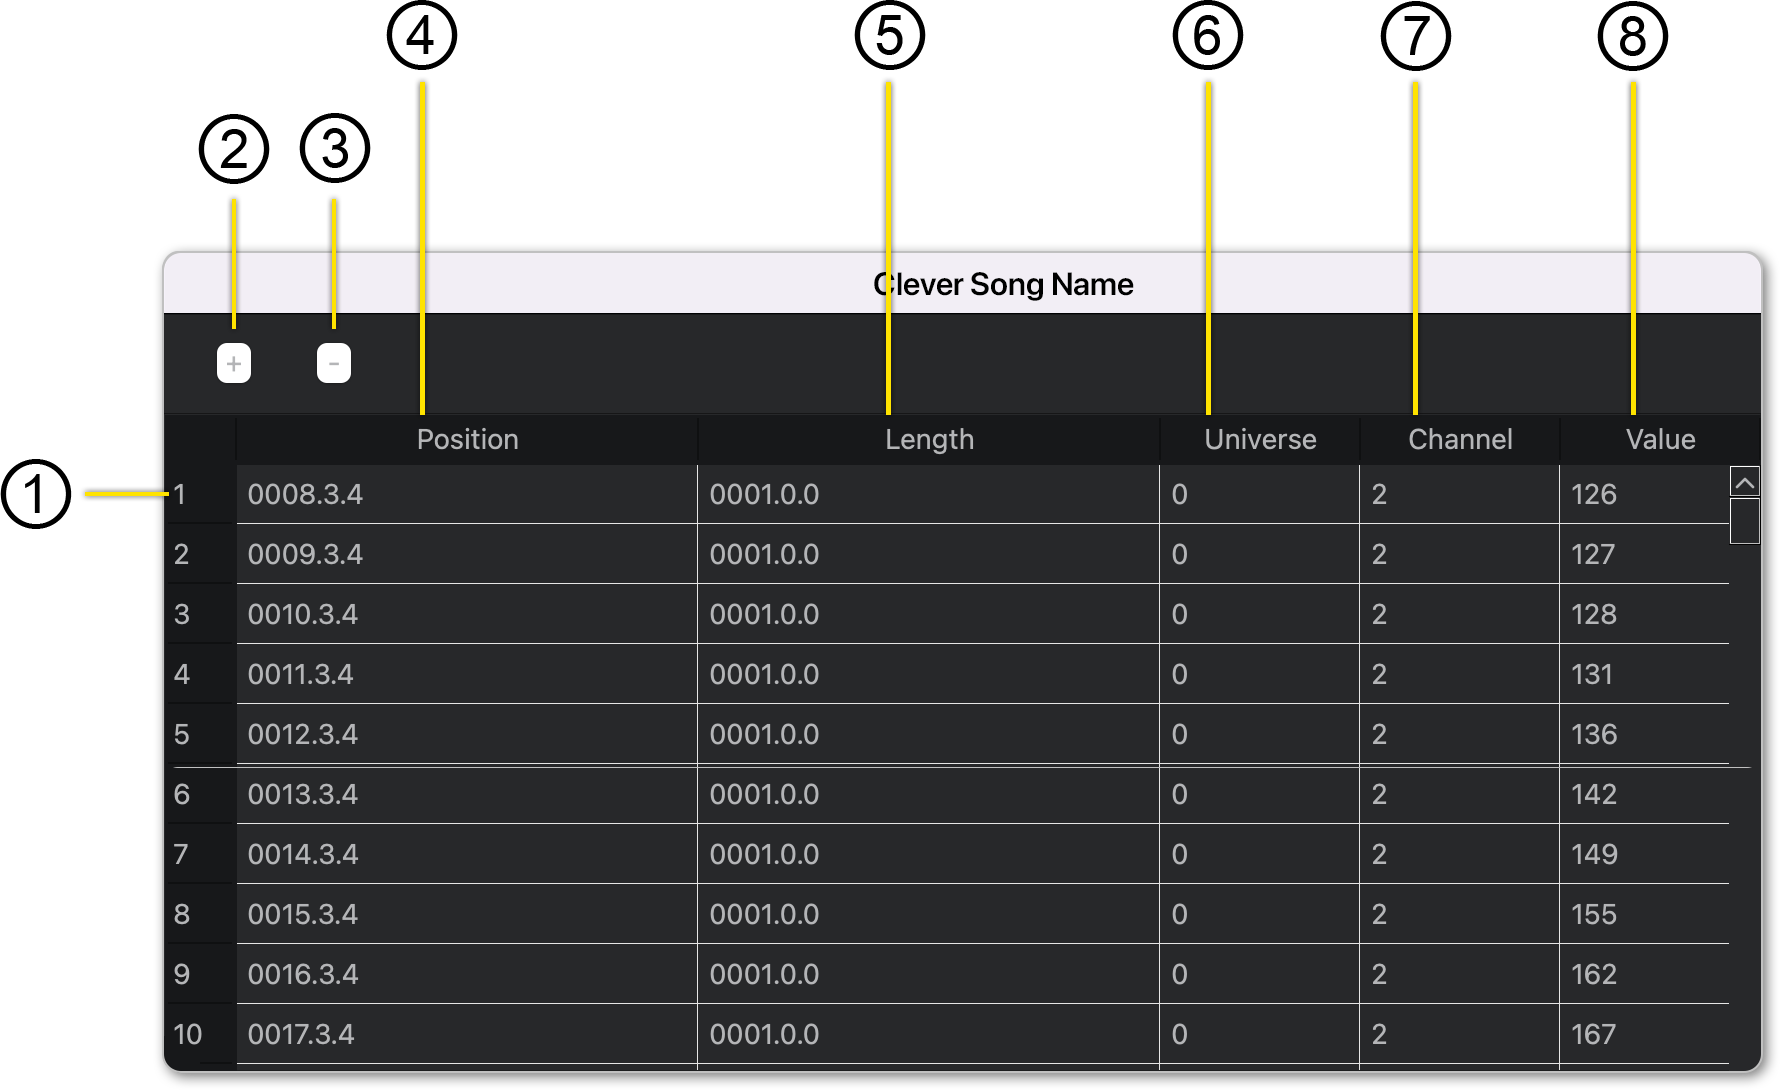
- Event ID
Every DMX Event has an incremental ID assigned by VST Live. This ID is for your own reference inside of the DMX List Editor, to help distinguish similar-looking Events.
- Add DMX Event
Click this button to add a DMX Event. The Event will be added at the Playhead’s current location.
You can view the Playhead’s current position in the Tracks View.
- Erase Tool
Deletes the selected DMX Event.
- Event Position
Indicates the position on the Timeline when the DMX Event occurs.
To the change it, click in this field. The Time dialogue box will appear, prompting you to input a new starting time for the DMX Event.
Because all DMX Events have a starting and ending event, only starting Events are displayed here—the Duration field specifies a DMX Event’s ending point.
- Event Length
To edit, click in the table cell corresponding to the Event. A Time dialogue will appear for you to enter the duration time into.
- Universe
The universe that A DMX Event belongs to is displayed here. You can switch the event to another universe by clicking in the cell; a pop-up menu will provide a list of alternate universes. Cool.
- DMX Channel
An Event’s DMX channel is displayed and accessible here. To change the Event’s channel, click inside the cell. A pop-menu will appear from which you may choose a new DMX channel.
- DMX Value
This cell provides access to the DMX Event’s value. To change the value, click inside the cell. A pop-menu will appear from which you may choose a new value.
VST Effects Editor🔗
VST effects are an integral part of VST Live, as available in Stacks and the Mixer.
VST Live has enhanced controls for VST effects, optimised for live performance.
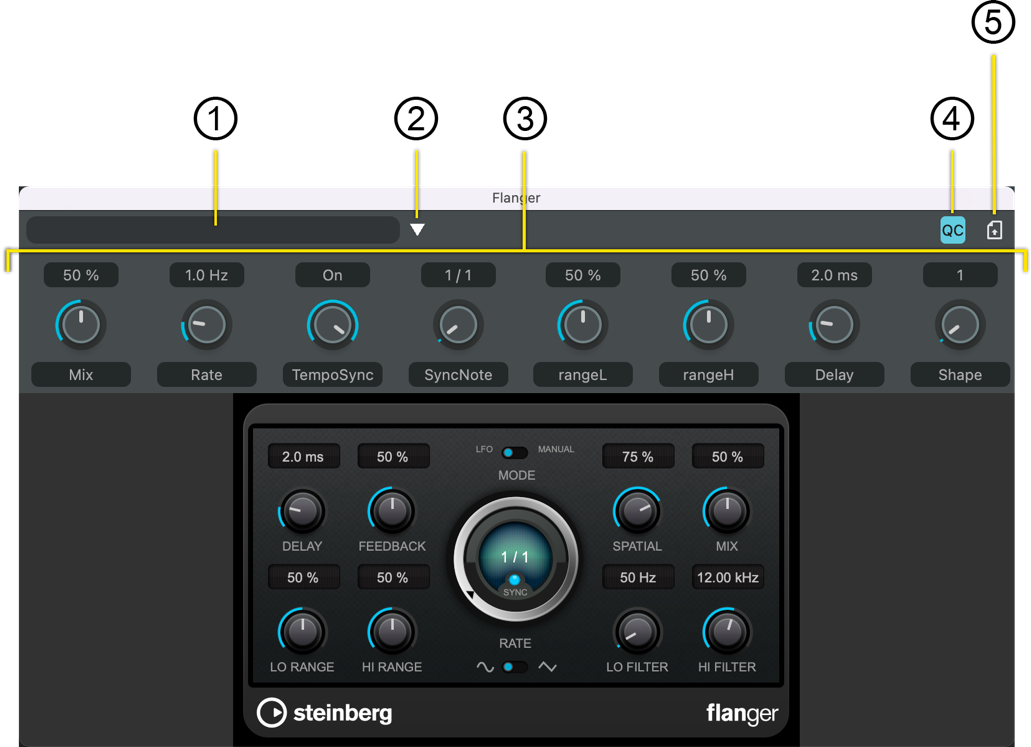
- Preset Name
If active, the current preset’s name is displayed here.
- Preset Activation
Save or load a preset.
- Assignable Quick Controllers
Eight controllers can be assigned to any parameter in the VST effect, controlled by an MIDI message.
- Quick Control Toggle
Toggles the Quick Controllers panel.
- Effect Interface State Toggle
Toggles saving the effect’s interface settings, including its editing panel, to its associated Song Part.